Question 1archived
Use the answer-neutral rendering of the archived question below.
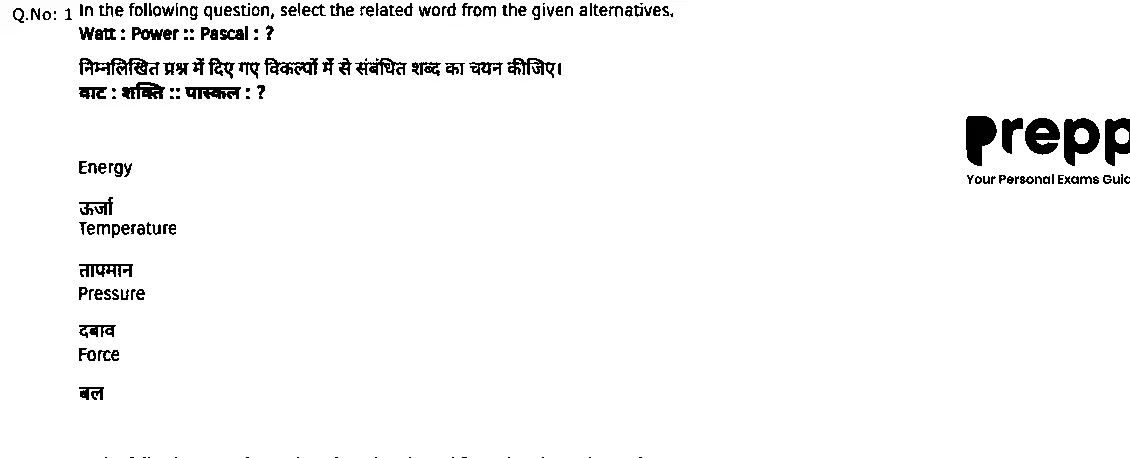
- A
Option A (shown in the question image)
- B
Option B (shown in the question image)
- C
Option C (shown in the question image)
- D
Option D (shown in the question image)
Show answer
C. Option C (shown in the question image)The marked option was checked against the archived source PDF. A worked explanation is not provided.
Paper & answer key PDF ↗ Question 2archived
Use the answer-neutral rendering of the archived question below.

- A
Option A (shown in the question image)
- B
Option B (shown in the question image)
- C
Option C (shown in the question image)
- D
Option D (shown in the question image)
Show answer
B. Option B (shown in the question image)The marked option was checked against the archived source PDF. A worked explanation is not provided.
Paper & answer key PDF ↗ Question 3archived
Use the answer-neutral rendering of the archived question below.
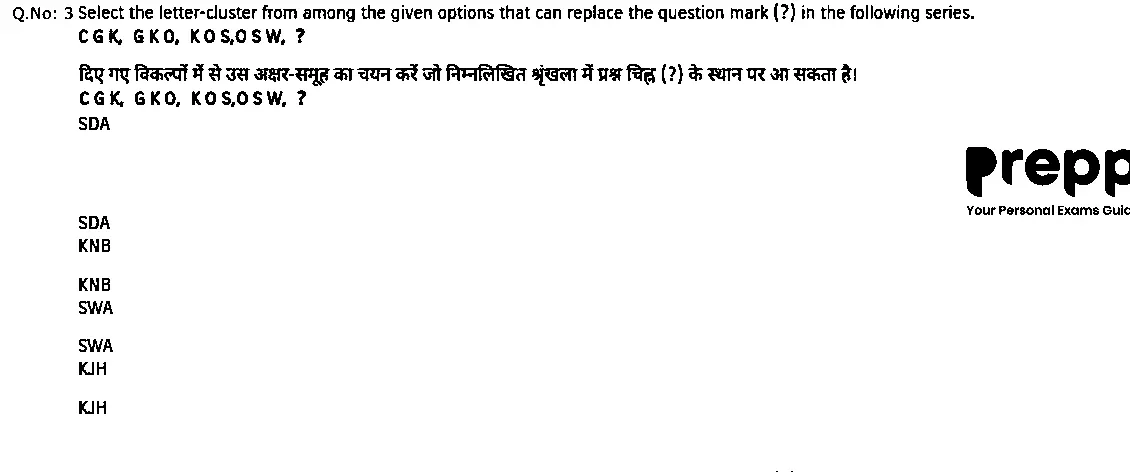
- A
Option A (shown in the question image)
- B
Option B (shown in the question image)
- C
Option C (shown in the question image)
- D
Option D (shown in the question image)
Show answer
C. Option C (shown in the question image)The marked option was checked against the archived source PDF. A worked explanation is not provided.
Paper & answer key PDF ↗ Question 4archived
Use the answer-neutral rendering of the archived question below.
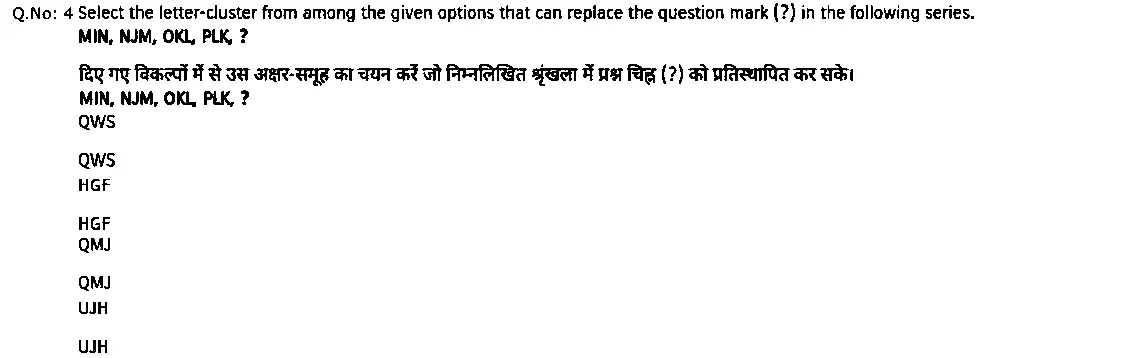
- A
Option A (shown in the question image)
- B
Option B (shown in the question image)
- C
Option C (shown in the question image)
- D
Option D (shown in the question image)
Show answer
C. Option C (shown in the question image)The marked option was checked against the archived source PDF. A worked explanation is not provided.
Paper & answer key PDF ↗ Question 5archived
Use the answer-neutral rendering of the archived question below.
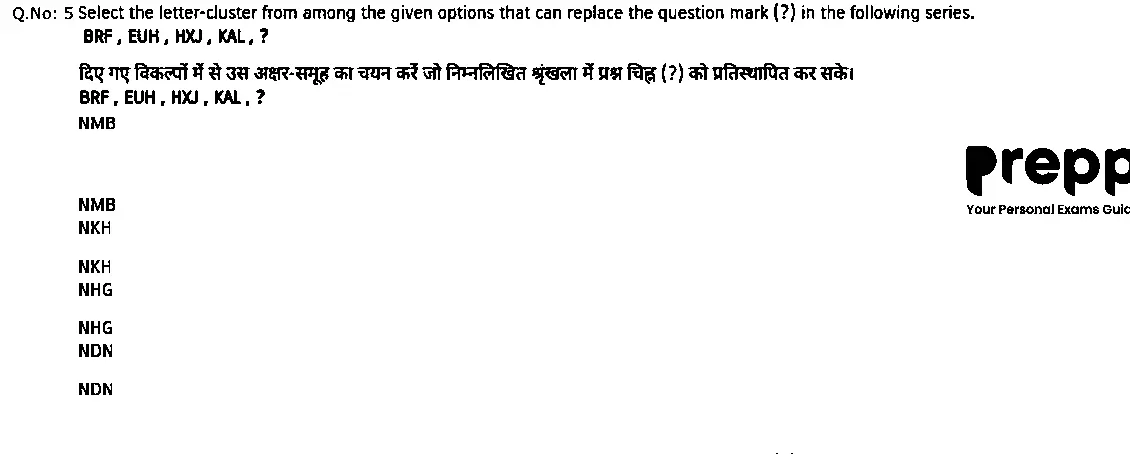
- A
Option A (shown in the question image)
- B
Option B (shown in the question image)
- C
Option C (shown in the question image)
- D
Option D (shown in the question image)
Show answer
D. Option D (shown in the question image)The marked option was checked against the archived source PDF. A worked explanation is not provided.
Paper & answer key PDF ↗ Question 6archived
Use the answer-neutral rendering of the archived question below.
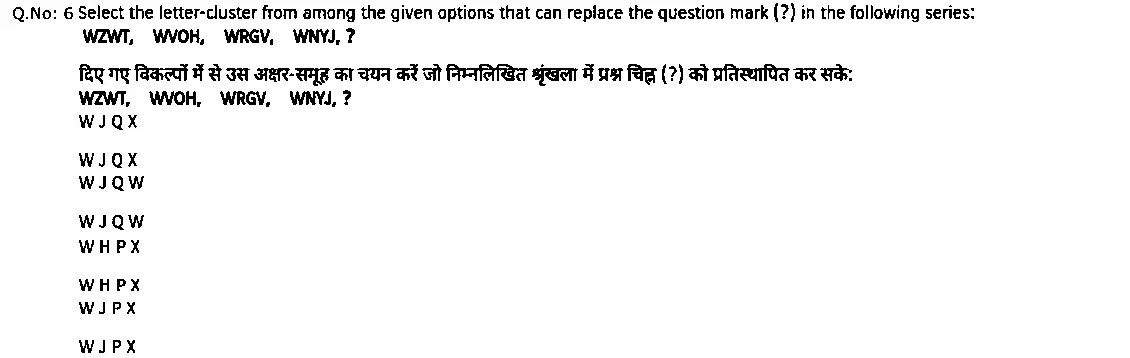
- A
Option A (shown in the question image)
- B
Option B (shown in the question image)
- C
Option C (shown in the question image)
- D
Option D (shown in the question image)
Show answer
A. Option A (shown in the question image)The marked option was checked against the archived source PDF. A worked explanation is not provided.
Paper & answer key PDF ↗ Question 7archived
Use the answer-neutral rendering of the archived question below.
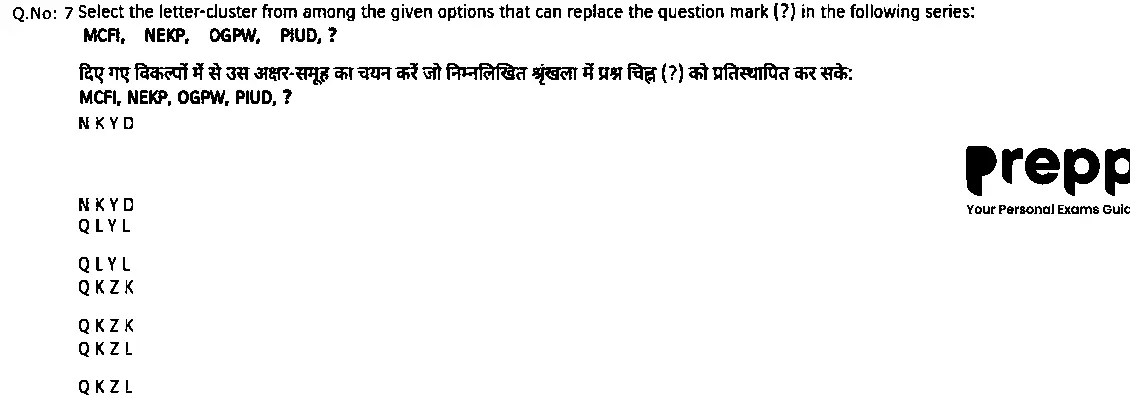
- A
Option A (shown in the question image)
- B
Option B (shown in the question image)
- C
Option C (shown in the question image)
- D
Option D (shown in the question image)
Show answer
C. Option C (shown in the question image)The marked option was checked against the archived source PDF. A worked explanation is not provided.
Paper & answer key PDF ↗ Question 8archived
Use the answer-neutral rendering of the archived question below.
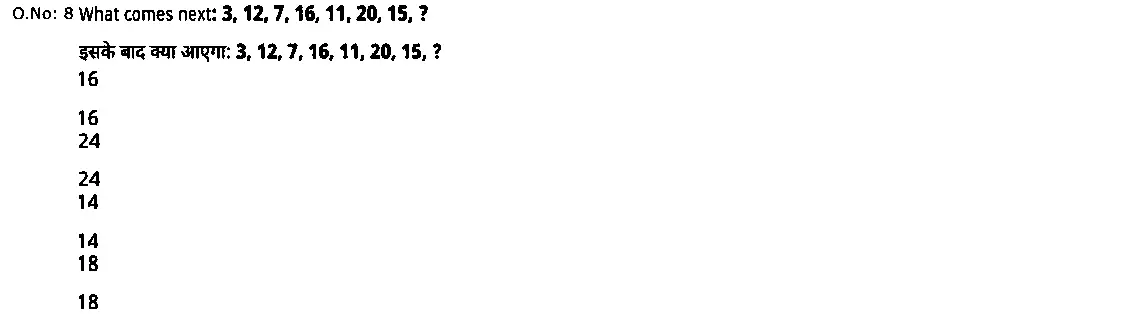
- A
Option A (shown in the question image)
- B
Option B (shown in the question image)
- C
Option C (shown in the question image)
- D
Option D (shown in the question image)
Show answer
B. Option B (shown in the question image)The marked option was checked against the archived source PDF. A worked explanation is not provided.
Paper & answer key PDF ↗ Question 9archived
Use the answer-neutral rendering of the archived question below.
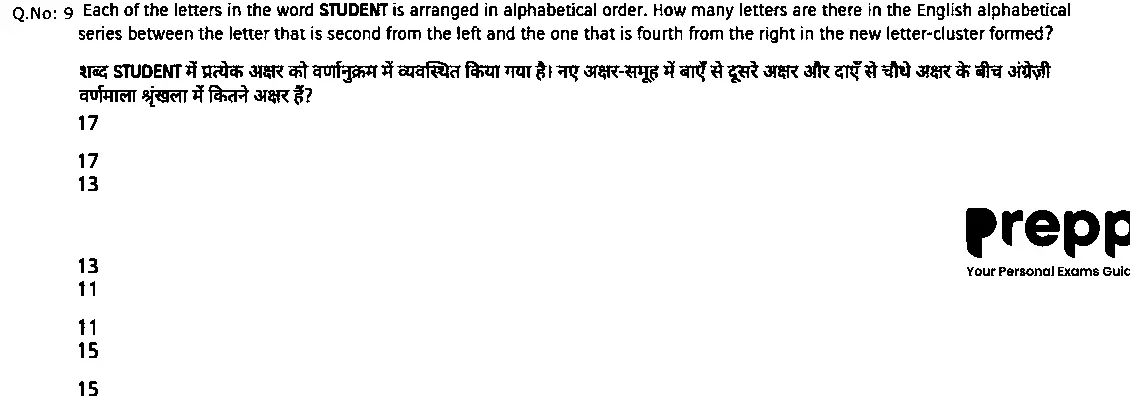
- A
Option A (shown in the question image)
- B
Option B (shown in the question image)
- C
Option C (shown in the question image)
- D
Option D (shown in the question image)
Show answer
B. Option B (shown in the question image)The marked option was checked against the archived source PDF. A worked explanation is not provided.
Paper & answer key PDF ↗ Question 10archived
Use the answer-neutral rendering of the archived question below.
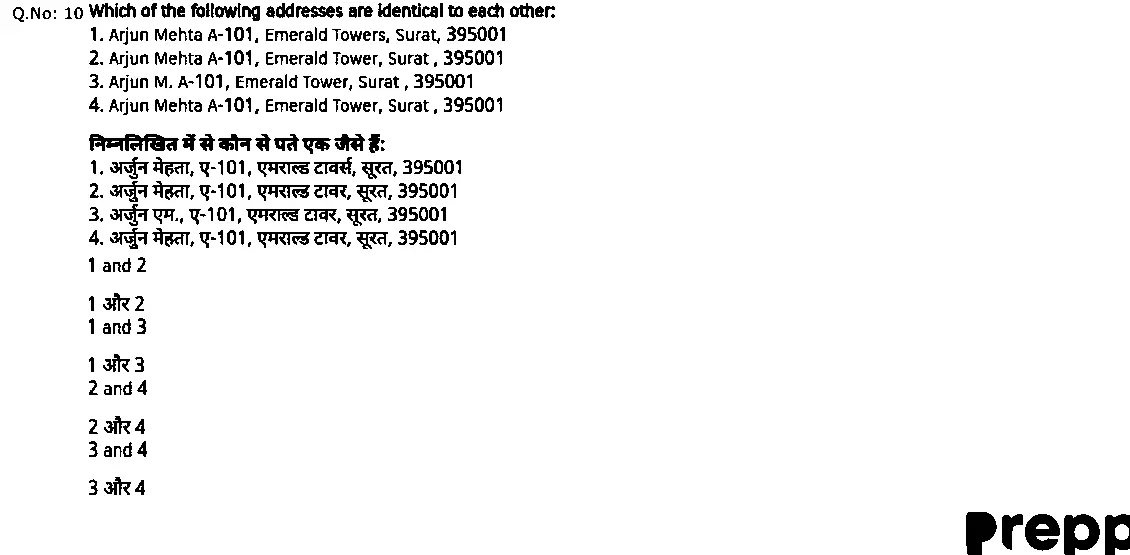
- A
Option A (shown in the question image)
- B
Option B (shown in the question image)
- C
Option C (shown in the question image)
- D
Option D (shown in the question image)
Show answer
C. Option C (shown in the question image)The marked option was checked against the archived source PDF. A worked explanation is not provided.
Paper & answer key PDF ↗ Question 11archived
Use the answer-neutral rendering of the archived question below.
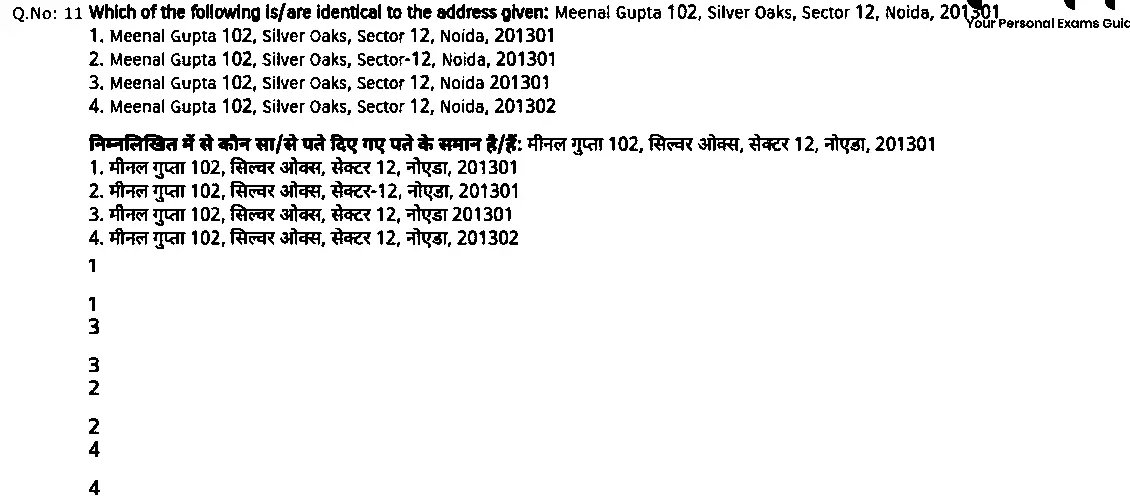
- A
Option A (shown in the question image)
- B
Option B (shown in the question image)
- C
Option C (shown in the question image)
- D
Option D (shown in the question image)
Show answer
A. Option A (shown in the question image)The marked option was checked against the archived source PDF. A worked explanation is not provided.
Paper & answer key PDF ↗ Question 12archived
Use the answer-neutral rendering of the archived question below.
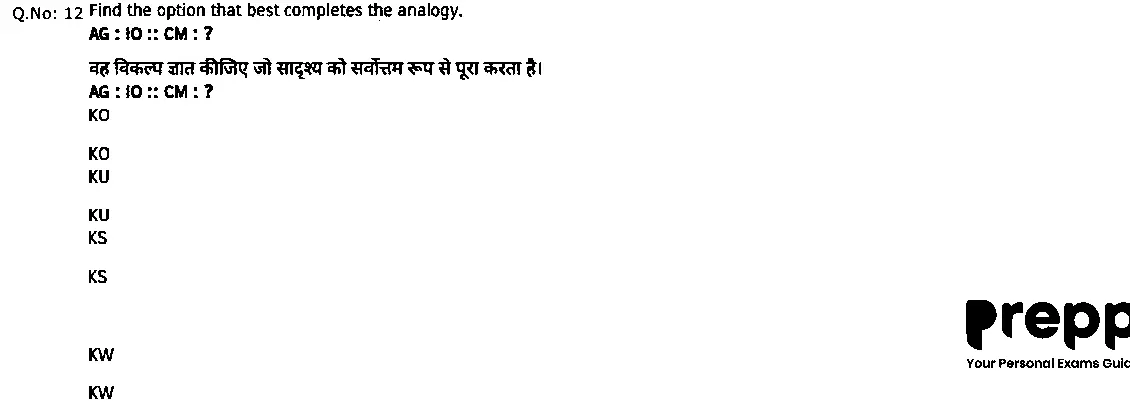
- A
Option A (shown in the question image)
- B
Option B (shown in the question image)
- C
Option C (shown in the question image)
- D
Option D (shown in the question image)
Show answer
B. Option B (shown in the question image)The marked option was checked against the archived source PDF. A worked explanation is not provided.
Paper & answer key PDF ↗ Question 13archived
Use the answer-neutral rendering of the archived question below.
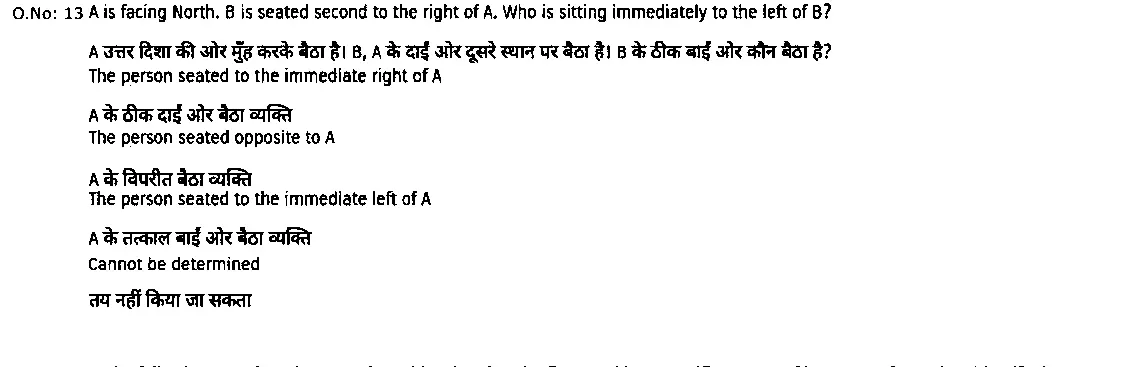
- A
Option A (shown in the question image)
- B
Option B (shown in the question image)
- C
Option C (shown in the question image)
- D
Option D (shown in the question image)
Show answer
A. Option A (shown in the question image)The marked option was checked against the archived source PDF. A worked explanation is not provided.
Paper & answer key PDF ↗ Question 14archived
Use the answer-neutral rendering of the archived question below.
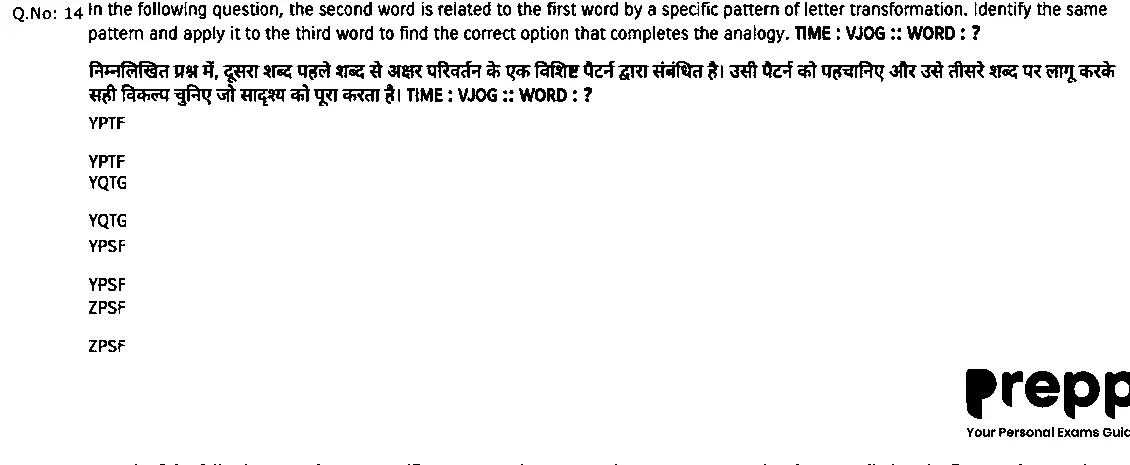
- A
Option A (shown in the question image)
- B
Option B (shown in the question image)
- C
Option C (shown in the question image)
- D
Option D (shown in the question image)
Show answer
A. Option A (shown in the question image)The marked option was checked against the archived source PDF. A worked explanation is not provided.
Paper & answer key PDF ↗ Question 15archived
Use the answer-neutral rendering of the archived question below.
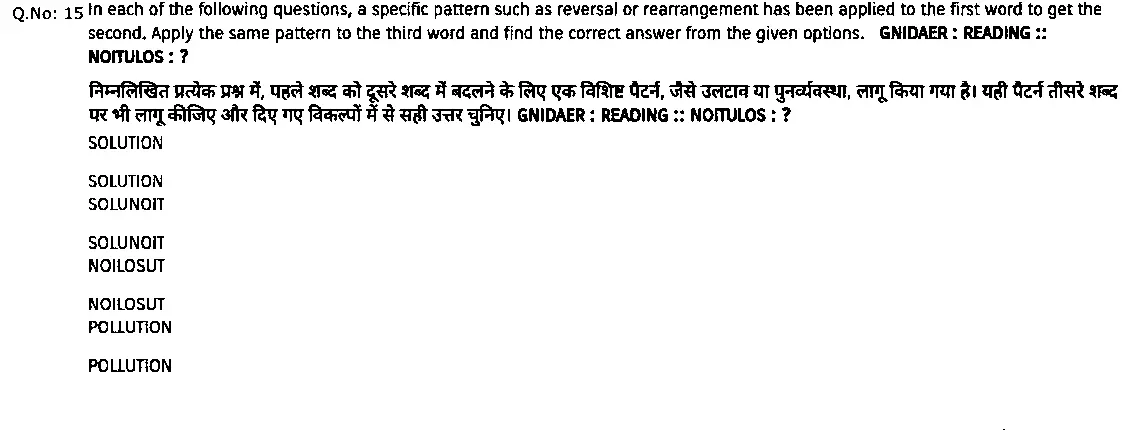
- A
Option A (shown in the question image)
- B
Option B (shown in the question image)
- C
Option C (shown in the question image)
- D
Option D (shown in the question image)
Show answer
A. Option A (shown in the question image)The marked option was checked against the archived source PDF. A worked explanation is not provided.
Paper & answer key PDF ↗ Question 16archived
Use the answer-neutral rendering of the archived question below.
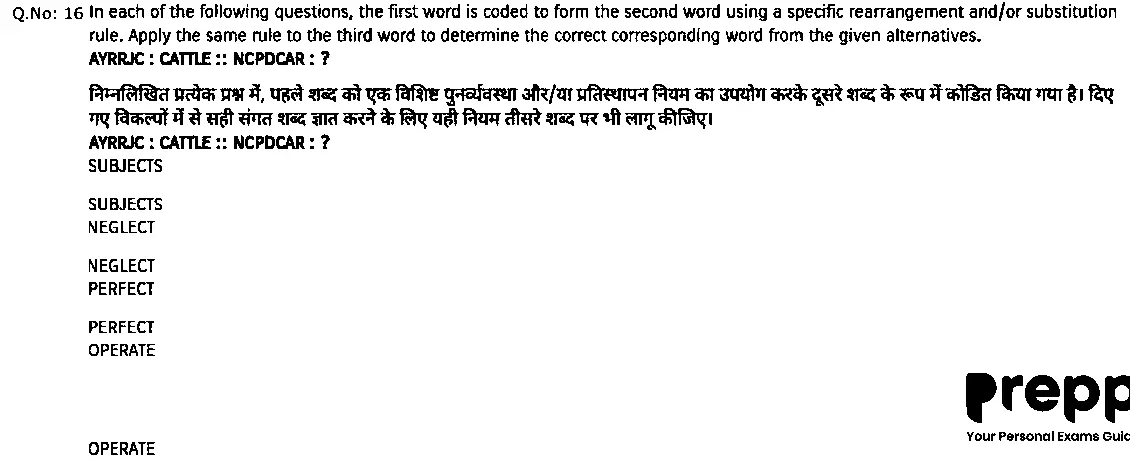
- A
Option A (shown in the question image)
- B
Option B (shown in the question image)
- C
Option C (shown in the question image)
- D
Option D (shown in the question image)
Show answer
C. Option C (shown in the question image)The marked option was checked against the archived source PDF. A worked explanation is not provided.
Paper & answer key PDF ↗ Question 17archived
Use the answer-neutral rendering of the archived question below.
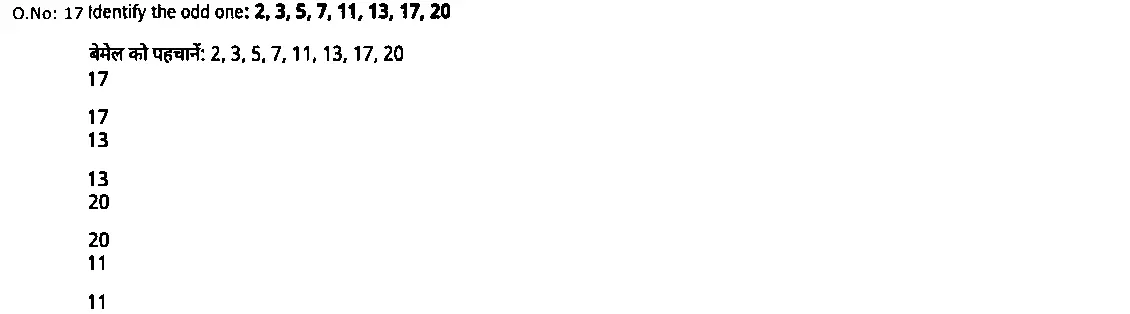
- A
Option A (shown in the question image)
- B
Option B (shown in the question image)
- C
Option C (shown in the question image)
- D
Option D (shown in the question image)
Show answer
C. Option C (shown in the question image)The marked option was checked against the archived source PDF. A worked explanation is not provided.
Paper & answer key PDF ↗ Question 18archived
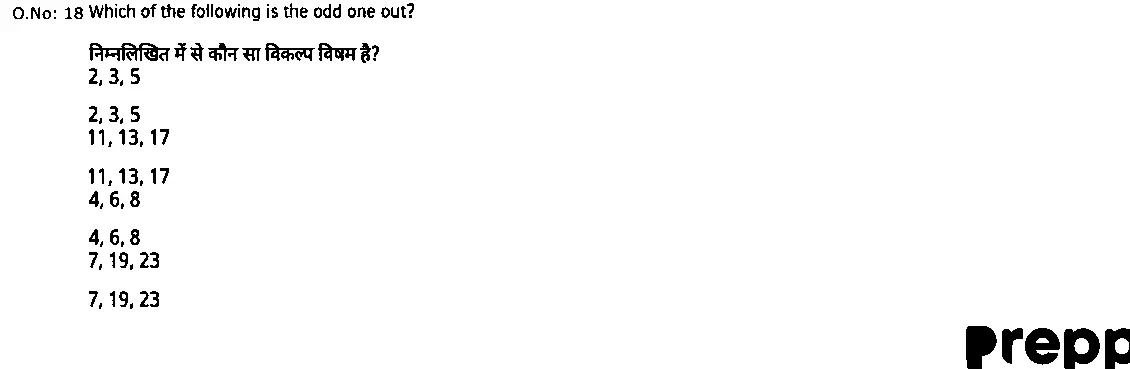
Use the answer-neutral rendering of the archived question below.
- A
Option A (shown in the question image)
- B
Option B (shown in the question image)
- C
Option C (shown in the question image)
- D
Option D (shown in the question image)
Show answer
C. Option C (shown in the question image)The marked option was checked against the archived source PDF. A worked explanation is not provided.
Paper & answer key PDF ↗ Question 19archived
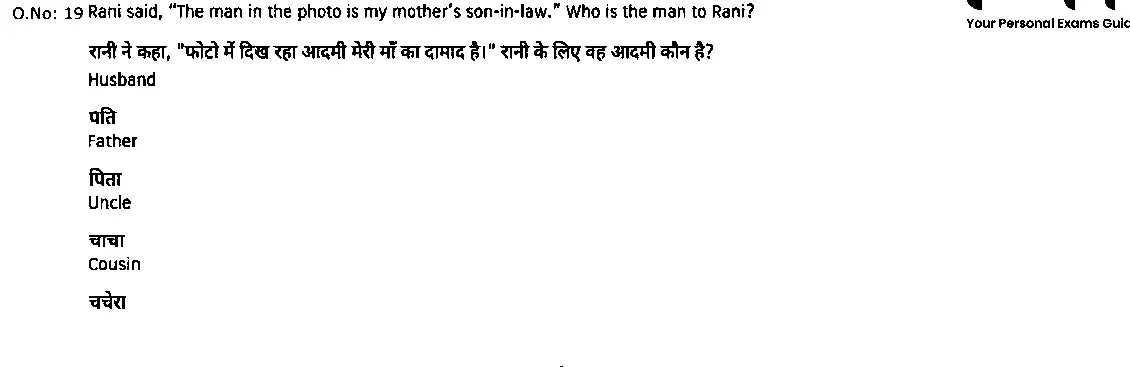
Use the answer-neutral rendering of the archived question below.
- A
Option A (shown in the question image)
- B
Option B (shown in the question image)
- C
Option C (shown in the question image)
- D
Option D (shown in the question image)
Show answer
A. Option A (shown in the question image)The marked option was checked against the archived source PDF. A worked explanation is not provided.
Paper & answer key PDF ↗ Question 20archived
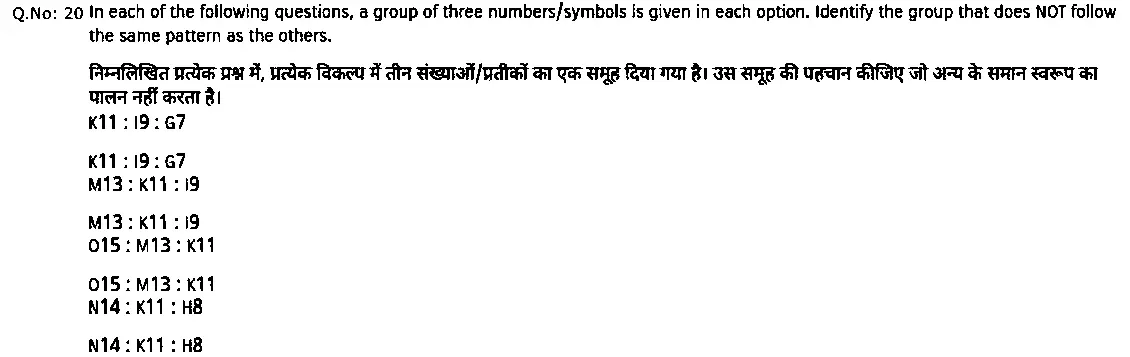
Use the answer-neutral rendering of the archived question below.
- A
Option A (shown in the question image)
- B
Option B (shown in the question image)
- C
Option C (shown in the question image)
- D
Option D (shown in the question image)
Show answer
D. Option D (shown in the question image)The marked option was checked against the archived source PDF. A worked explanation is not provided.
Paper & answer key PDF ↗ Question 21archived
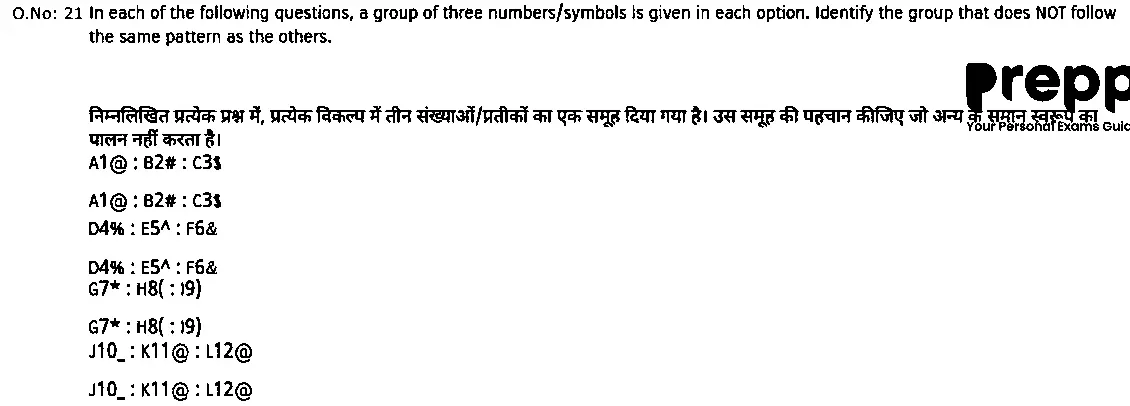
Use the answer-neutral rendering of the archived question below.
- A
Option A (shown in the question image)
- B
Option B (shown in the question image)
- C
Option C (shown in the question image)
- D
Option D (shown in the question image)
Show answer
D. Option D (shown in the question image)The marked option was checked against the archived source PDF. A worked explanation is not provided.
Paper & answer key PDF ↗ Question 22archived
Use the answer-neutral rendering of the archived question below.
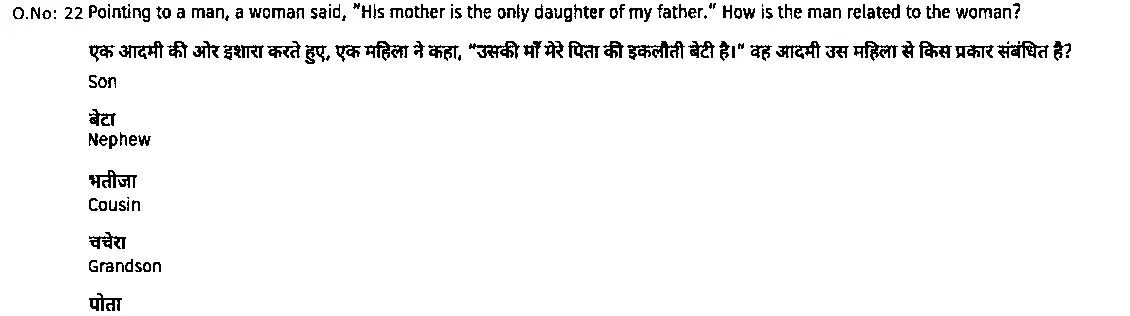
- A
Option A (shown in the question image)
- B
Option B (shown in the question image)
- C
Option C (shown in the question image)
- D
Option D (shown in the question image)
Show answer
A. Option A (shown in the question image)The marked option was checked against the archived source PDF. A worked explanation is not provided.
Paper & answer key PDF ↗ Question 23archived
Use the answer-neutral rendering of the archived question below.
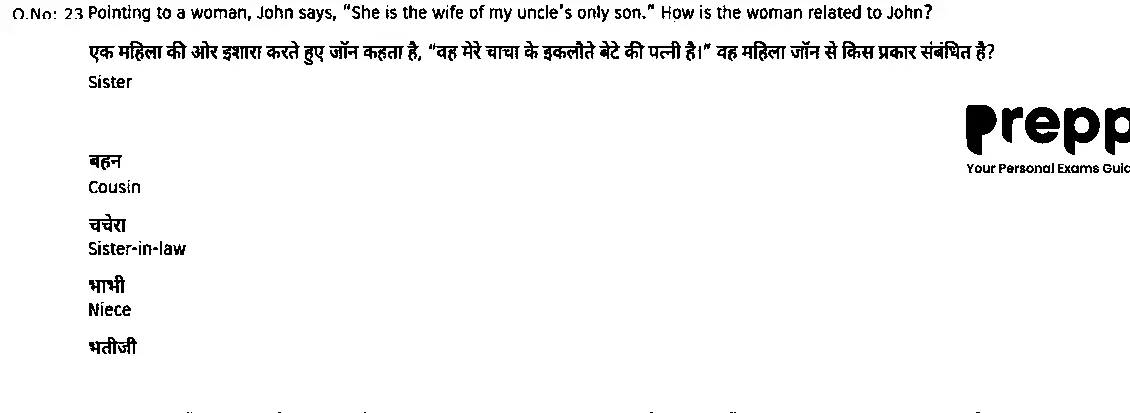
- A
Option A (shown in the question image)
- B
Option B (shown in the question image)
- C
Option C (shown in the question image)
- D
Option D (shown in the question image)
Show answer
C. Option C (shown in the question image)The marked option was checked against the archived source PDF. A worked explanation is not provided.
Paper & answer key PDF ↗ Question 24archived
Use the answer-neutral rendering of the archived question below.
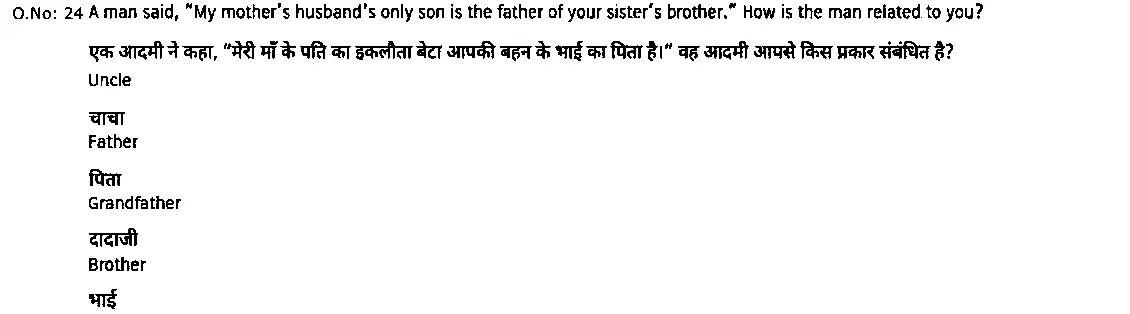
- A
Option A (shown in the question image)
- B
Option B (shown in the question image)
- C
Option C (shown in the question image)
- D
Option D (shown in the question image)
Show answer
B. Option B (shown in the question image)The marked option was checked against the archived source PDF. A worked explanation is not provided.
Paper & answer key PDF ↗ Question 25archived
Use the answer-neutral rendering of the archived question below.
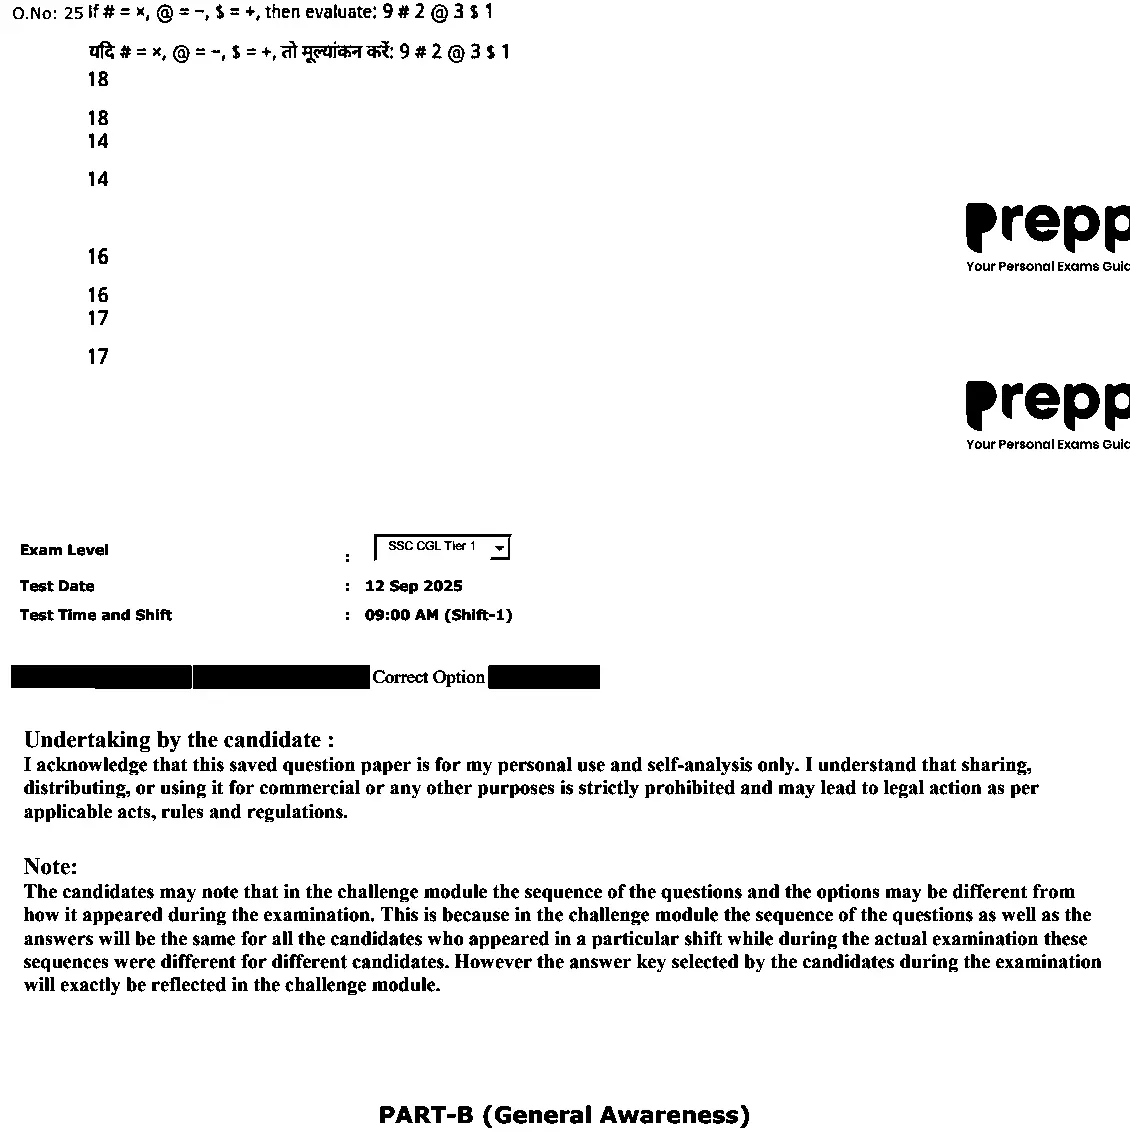
- A
Option A (shown in the question image)
- B
Option B (shown in the question image)
- C
Option C (shown in the question image)
- D
Option D (shown in the question image)
Show answer
C. Option C (shown in the question image)The marked option was checked against the archived source PDF. A worked explanation is not provided.
Paper & answer key PDF ↗ Question 26archived
Use the answer-neutral rendering of the archived question below.
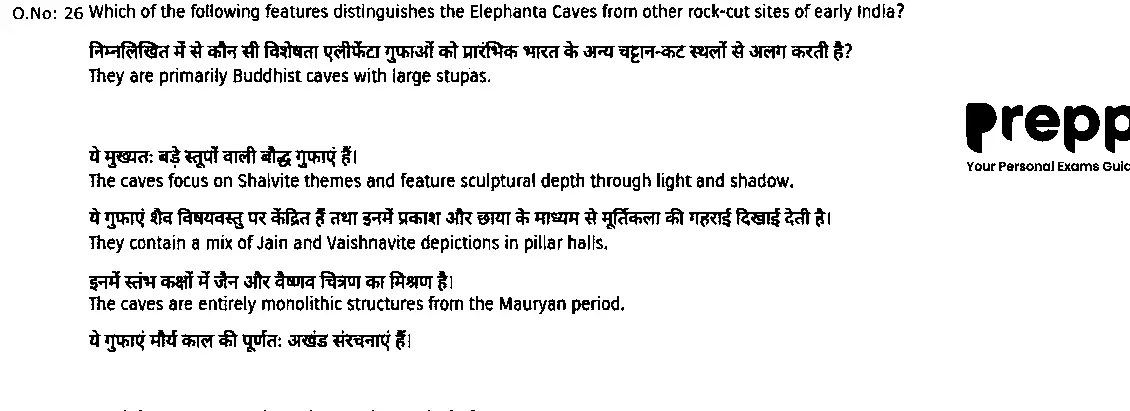
- A
Option A (shown in the question image)
- B
Option B (shown in the question image)
- C
Option C (shown in the question image)
- D
Option D (shown in the question image)
Show answer
B. Option B (shown in the question image)The marked option was checked against the archived source PDF. A worked explanation is not provided.
Paper & answer key PDF ↗ Question 27archived
Use the answer-neutral rendering of the archived question below.
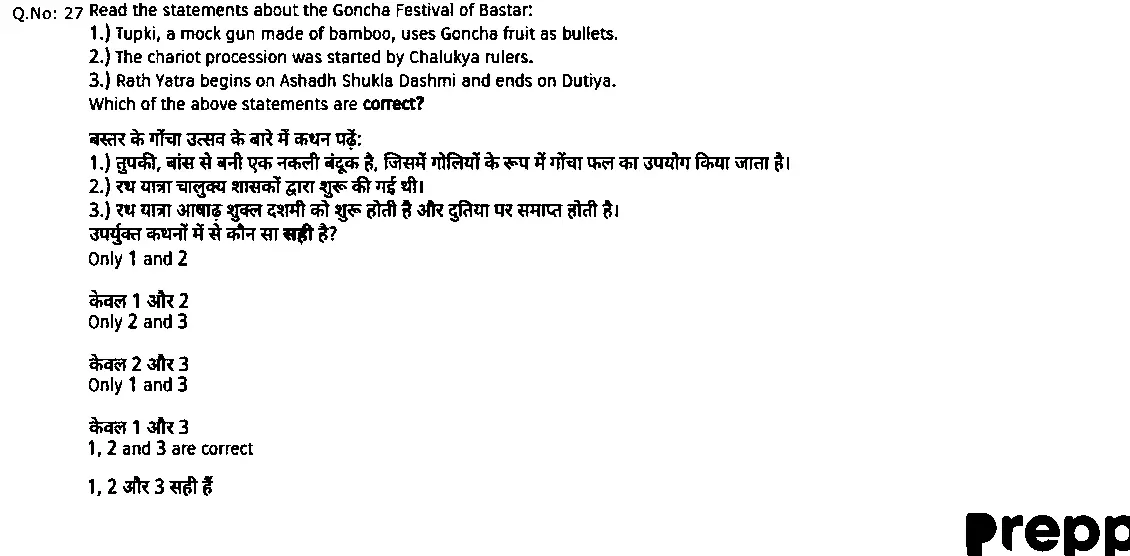
- A
Option A (shown in the question image)
- B
Option B (shown in the question image)
- C
Option C (shown in the question image)
- D
Option D (shown in the question image)
Show answer
A. Option A (shown in the question image)The marked option was checked against the archived source PDF. A worked explanation is not provided.
Paper & answer key PDF ↗ Question 28archived
Use the answer-neutral rendering of the archived question below.
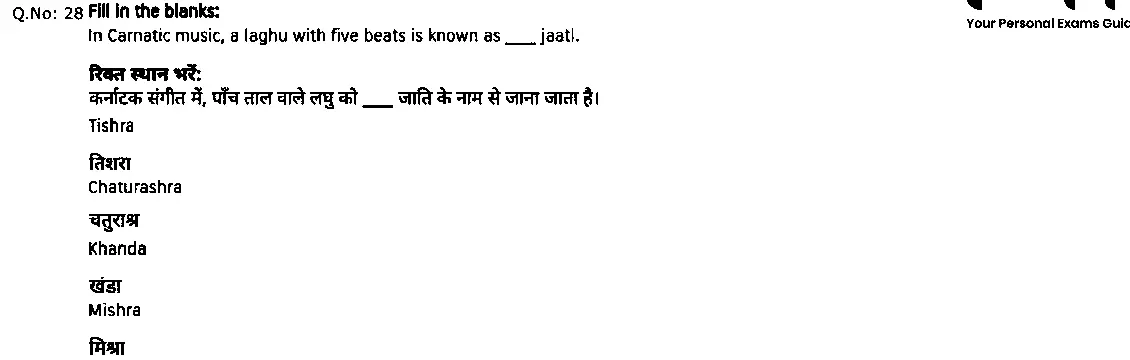
- A
Option A (shown in the question image)
- B
Option B (shown in the question image)
- C
Option C (shown in the question image)
- D
Option D (shown in the question image)
Show answer
C. Option C (shown in the question image)The marked option was checked against the archived source PDF. A worked explanation is not provided.
Paper & answer key PDF ↗ Question 29archived
Use the answer-neutral rendering of the archived question below.
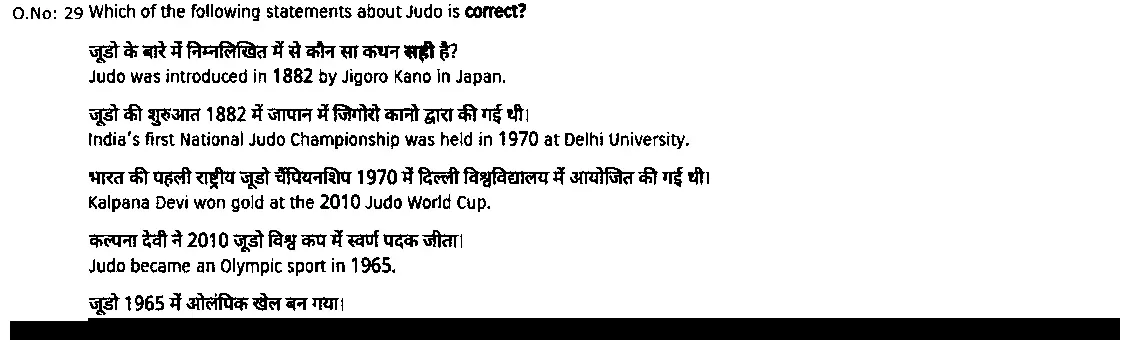
- A
Option A (shown in the question image)
- B
Option B (shown in the question image)
- C
Option C (shown in the question image)
- D
Option D (shown in the question image)
Show answer
A. Option A (shown in the question image)The marked option was checked against the archived source PDF. A worked explanation is not provided.
Paper & answer key PDF ↗ Question 30archived
Use the answer-neutral rendering of the archived question below.
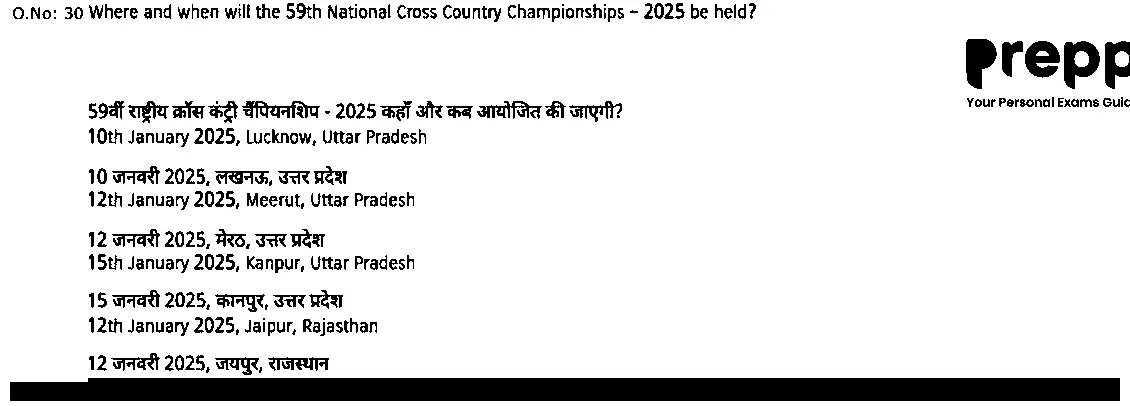
- A
Option A (shown in the question image)
- B
Option B (shown in the question image)
- C
Option C (shown in the question image)
- D
Option D (shown in the question image)
Show answer
B. Option B (shown in the question image)The marked option was checked against the archived source PDF. A worked explanation is not provided.
Paper & answer key PDF ↗ Question 31archived
Use the answer-neutral rendering of the archived question below.

- A
Option A (shown in the question image)
- B
Option B (shown in the question image)
- C
Option C (shown in the question image)
- D
Option D (shown in the question image)
Show answer
C. Option C (shown in the question image)The marked option was checked against the archived source PDF. A worked explanation is not provided.
Paper & answer key PDF ↗ Question 32archived
Use the answer-neutral rendering of the archived question below.
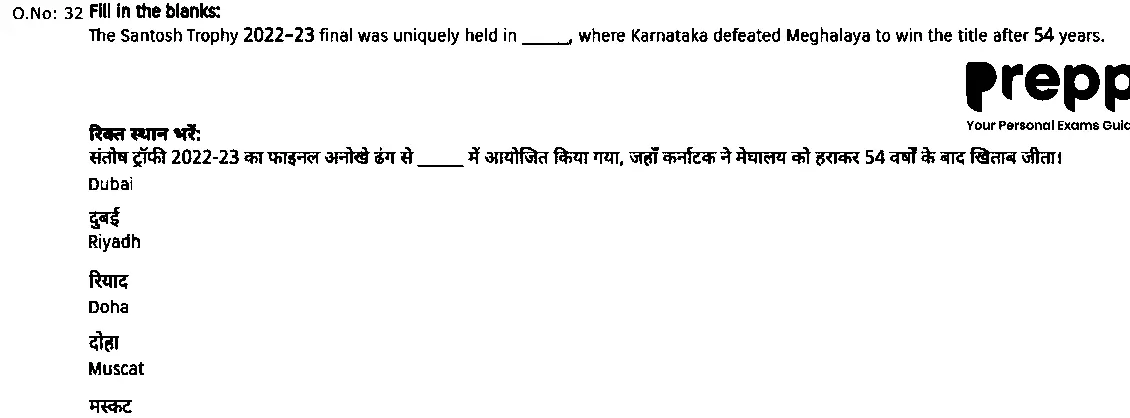
- A
Option A (shown in the question image)
- B
Option B (shown in the question image)
- C
Option C (shown in the question image)
- D
Option D (shown in the question image)
Show answer
B. Option B (shown in the question image)The marked option was checked against the archived source PDF. A worked explanation is not provided.
Paper & answer key PDF ↗ Question 33archived
Use the answer-neutral rendering of the archived question below.
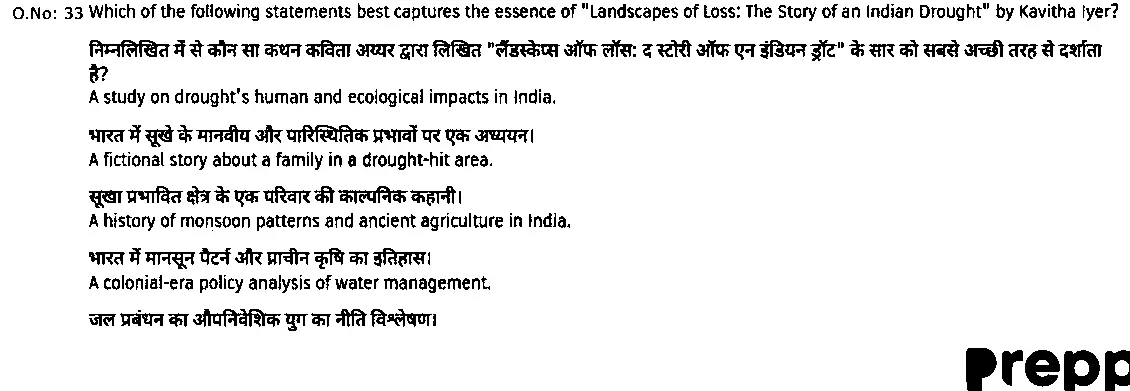
- A
Option A (shown in the question image)
- B
Option B (shown in the question image)
- C
Option C (shown in the question image)
- D
Option D (shown in the question image)
Show answer
A. Option A (shown in the question image)The marked option was checked against the archived source PDF. A worked explanation is not provided.
Paper & answer key PDF ↗ Question 34archived
Use the answer-neutral rendering of the archived question below.
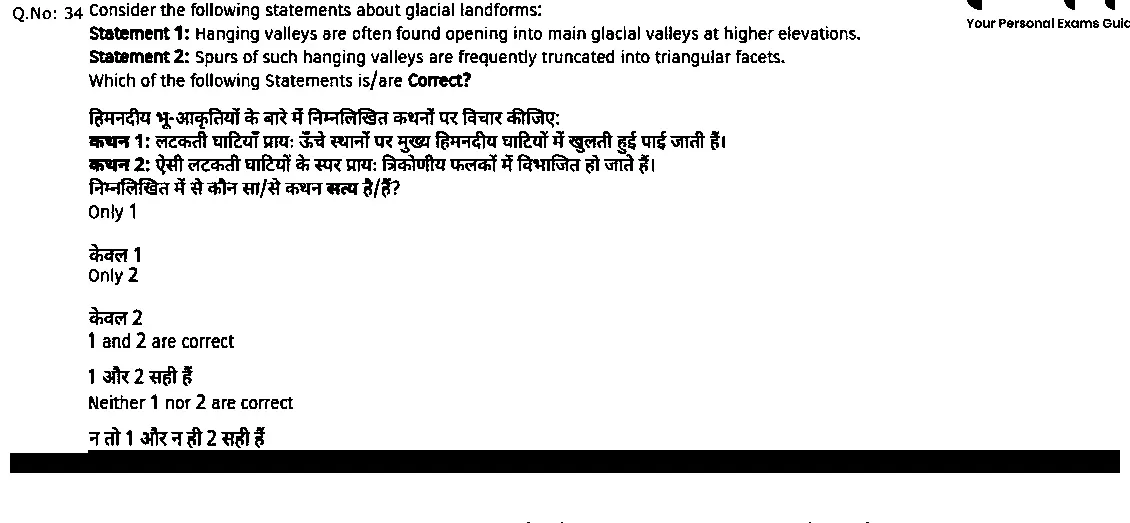
- A
Option A (shown in the question image)
- B
Option B (shown in the question image)
- C
Option C (shown in the question image)
- D
Option D (shown in the question image)
Show answer
C. Option C (shown in the question image)The marked option was checked against the archived source PDF. A worked explanation is not provided.
Paper & answer key PDF ↗ Question 35archived
Use the answer-neutral rendering of the archived question below.
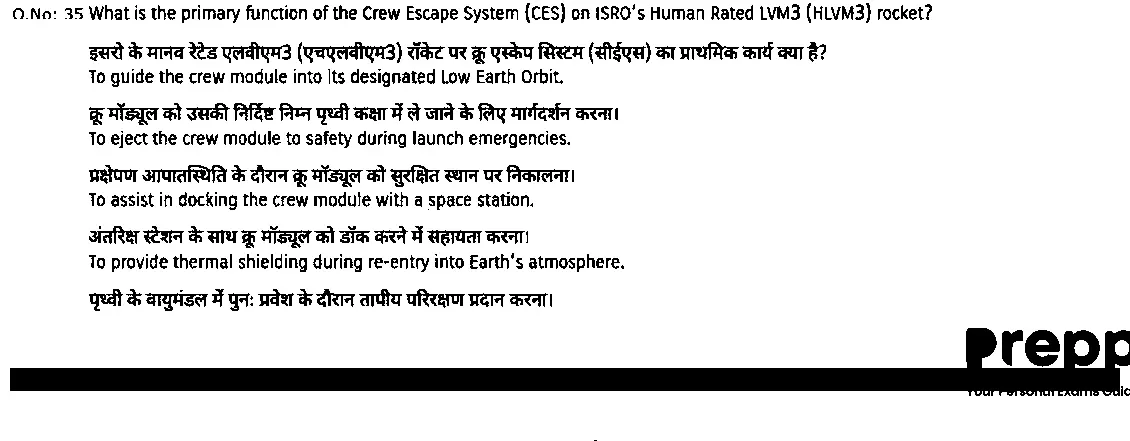
- A
Option A (shown in the question image)
- B
Option B (shown in the question image)
- C
Option C (shown in the question image)
- D
Option D (shown in the question image)
Show answer
B. Option B (shown in the question image)The marked option was checked against the archived source PDF. A worked explanation is not provided.
Paper & answer key PDF ↗ Question 36archived
Use the answer-neutral rendering of the archived question below.
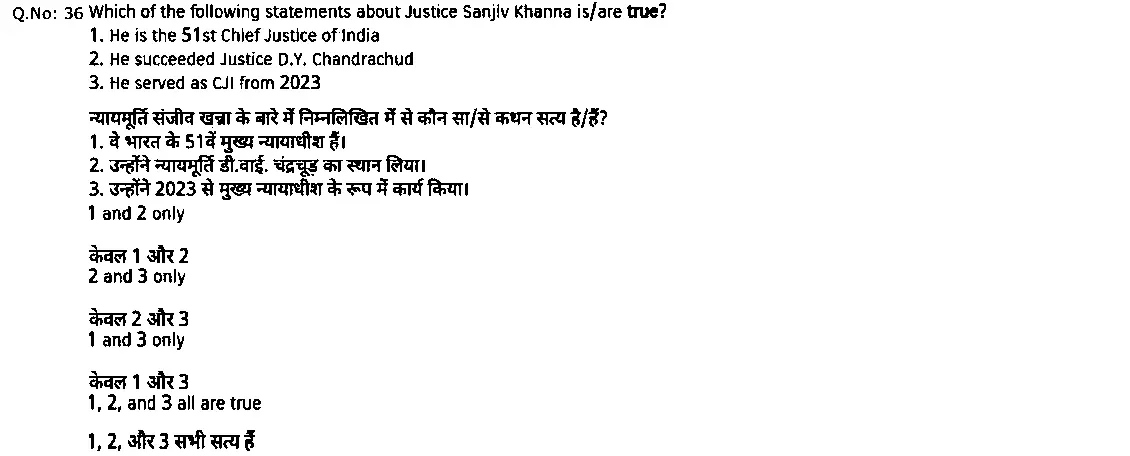
- A
Option A (shown in the question image)
- B
Option B (shown in the question image)
- C
Option C (shown in the question image)
- D
Option D (shown in the question image)
Show answer
A. Option A (shown in the question image)The marked option was checked against the archived source PDF. A worked explanation is not provided.
Paper & answer key PDF ↗ Question 37archived
Use the answer-neutral rendering of the archived question below.
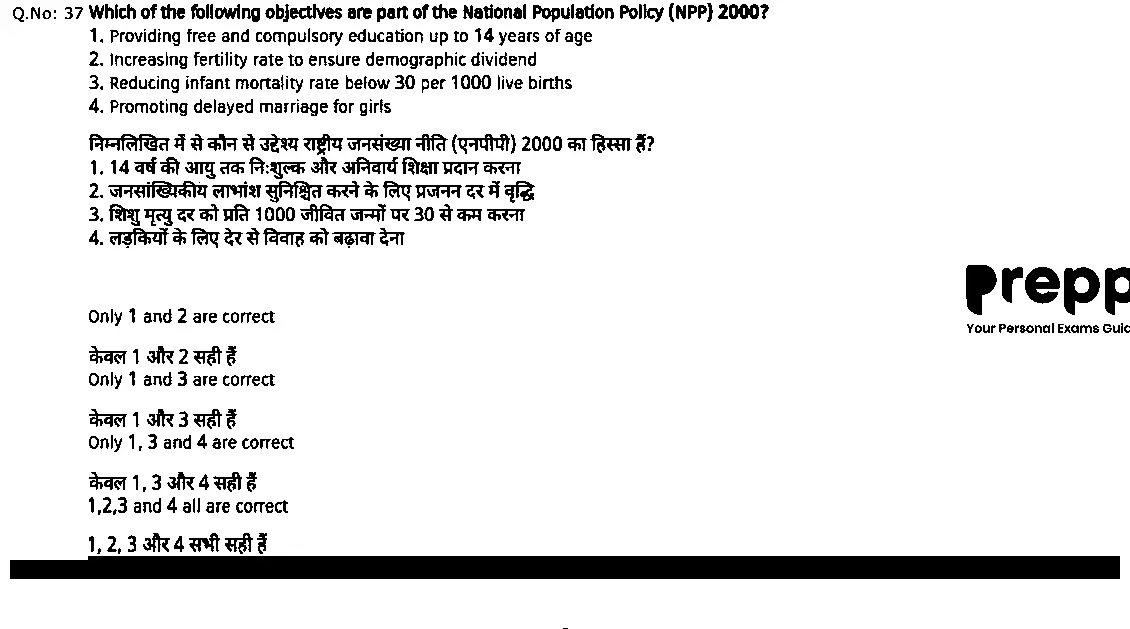
- A
Option A (shown in the question image)
- B
Option B (shown in the question image)
- C
Option C (shown in the question image)
- D
Option D (shown in the question image)
Show answer
C. Option C (shown in the question image)The marked option was checked against the archived source PDF. A worked explanation is not provided.
Paper & answer key PDF ↗ Question 38archived
Use the answer-neutral rendering of the archived question below.
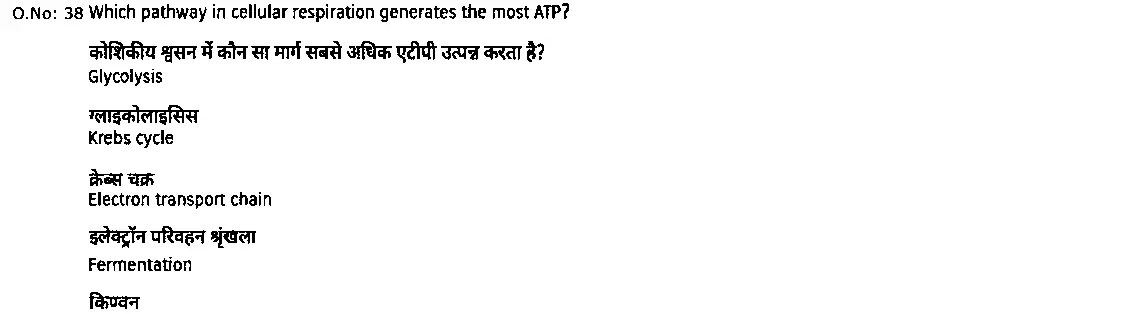
- A
Option A (shown in the question image)
- B
Option B (shown in the question image)
- C
Option C (shown in the question image)
- D
Option D (shown in the question image)
Show answer
C. Option C (shown in the question image)The marked option was checked against the archived source PDF. A worked explanation is not provided.
Paper & answer key PDF ↗ Question 39archived
Use the answer-neutral rendering of the archived question below.
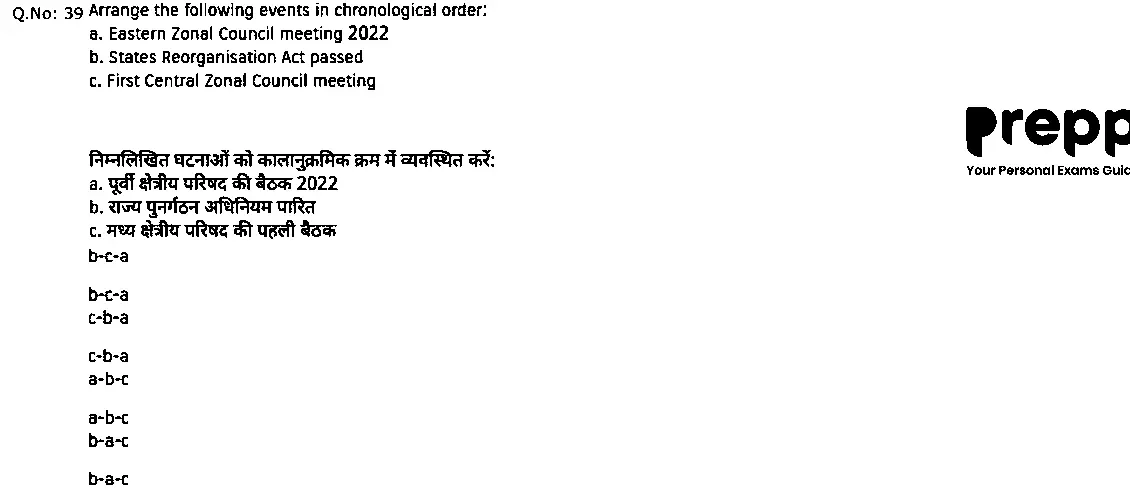
- A
Option A (shown in the question image)
- B
Option B (shown in the question image)
- C
Option C (shown in the question image)
- D
Option D (shown in the question image)
Show answer
A. Option A (shown in the question image)The marked option was checked against the archived source PDF. A worked explanation is not provided.
Paper & answer key PDF ↗ Question 40archived
Use the answer-neutral rendering of the archived question below.
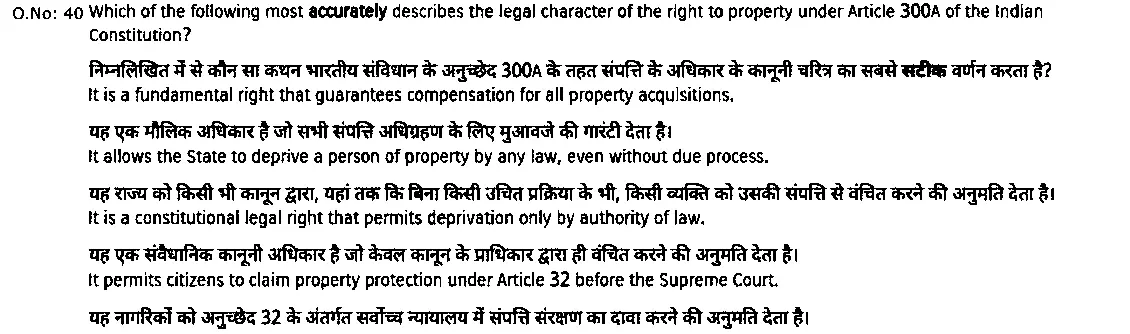
- A
Option A (shown in the question image)
- B
Option B (shown in the question image)
- C
Option C (shown in the question image)
- D
Option D (shown in the question image)
Show answer
C. Option C (shown in the question image)The marked option was checked against the archived source PDF. A worked explanation is not provided.
Paper & answer key PDF ↗ Question 41archived
Use the answer-neutral rendering of the archived question below.
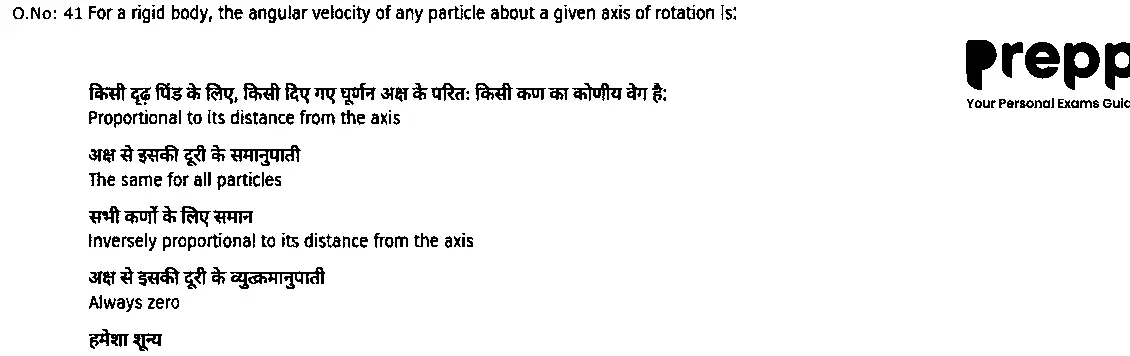
- A
Option A (shown in the question image)
- B
Option B (shown in the question image)
- C
Option C (shown in the question image)
- D
Option D (shown in the question image)
Show answer
B. Option B (shown in the question image)The marked option was checked against the archived source PDF. A worked explanation is not provided.
Paper & answer key PDF ↗ Question 42archived
Use the answer-neutral rendering of the archived question below.
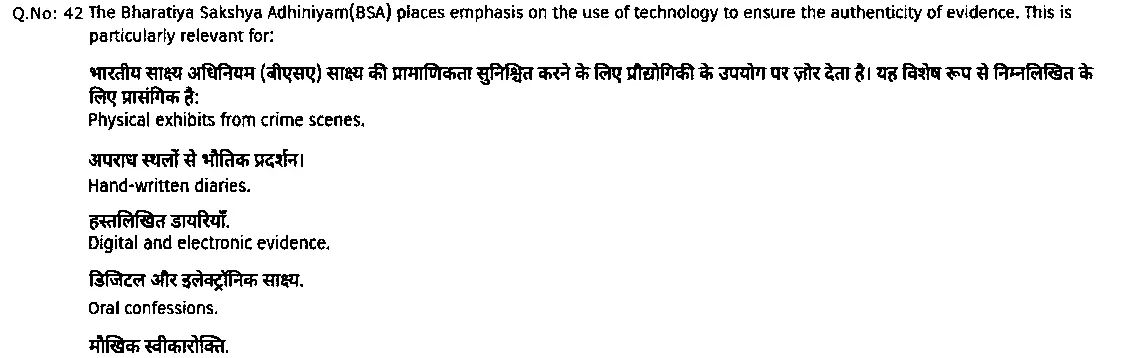
- A
Option A (shown in the question image)
- B
Option B (shown in the question image)
- C
Option C (shown in the question image)
- D
Option D (shown in the question image)
Show answer
C. Option C (shown in the question image)The marked option was checked against the archived source PDF. A worked explanation is not provided.
Paper & answer key PDF ↗ Question 43archived
Use the answer-neutral rendering of the archived question below.
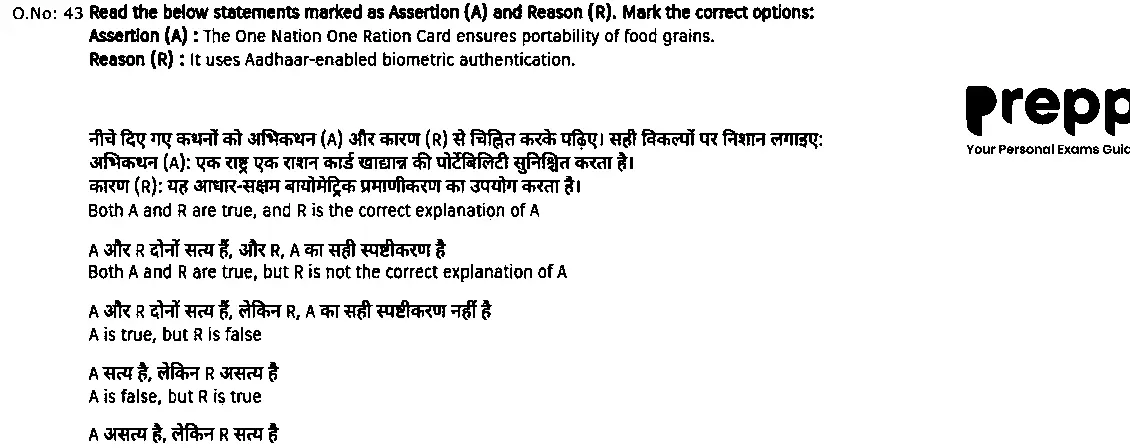
- A
Option A (shown in the question image)
- B
Option B (shown in the question image)
- C
Option C (shown in the question image)
- D
Option D (shown in the question image)
Show answer
A. Option A (shown in the question image)The marked option was checked against the archived source PDF. A worked explanation is not provided.
Paper & answer key PDF ↗ Question 44archived
Use the answer-neutral rendering of the archived question below.
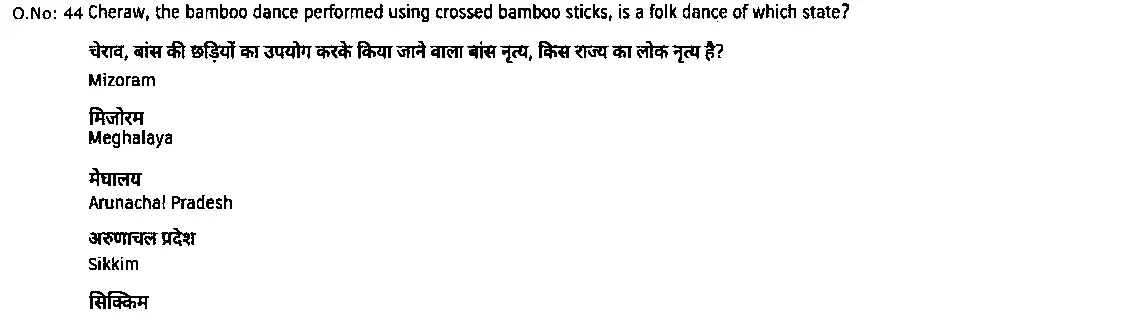
- A
Option A (shown in the question image)
- B
Option B (shown in the question image)
- C
Option C (shown in the question image)
- D
Option D (shown in the question image)
Show answer
A. Option A (shown in the question image)The marked option was checked against the archived source PDF. A worked explanation is not provided.
Paper & answer key PDF ↗ Question 45archived
Use the answer-neutral rendering of the archived question below.
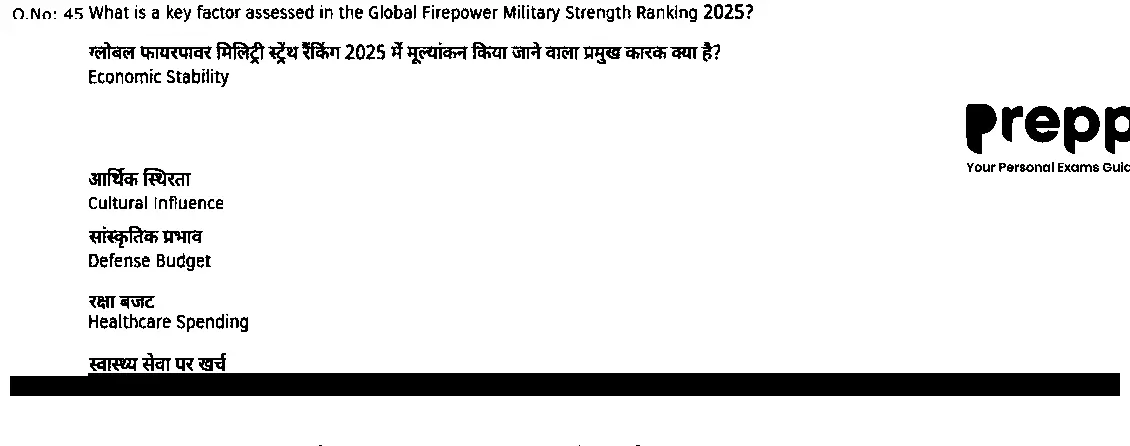
- A
Option A (shown in the question image)
- B
Option B (shown in the question image)
- C
Option C (shown in the question image)
- D
Option D (shown in the question image)
Show answer
C. Option C (shown in the question image)The marked option was checked against the archived source PDF. A worked explanation is not provided.
Paper & answer key PDF ↗ Question 46archived
Use the answer-neutral rendering of the archived question below.

- A
Option A (shown in the question image)
- B
Option B (shown in the question image)
- C
Option C (shown in the question image)
- D
Option D (shown in the question image)
Show answer
C. Option C (shown in the question image)The marked option was checked against the archived source PDF. A worked explanation is not provided.
Paper & answer key PDF ↗ Question 47archived
Use the answer-neutral rendering of the archived question below.
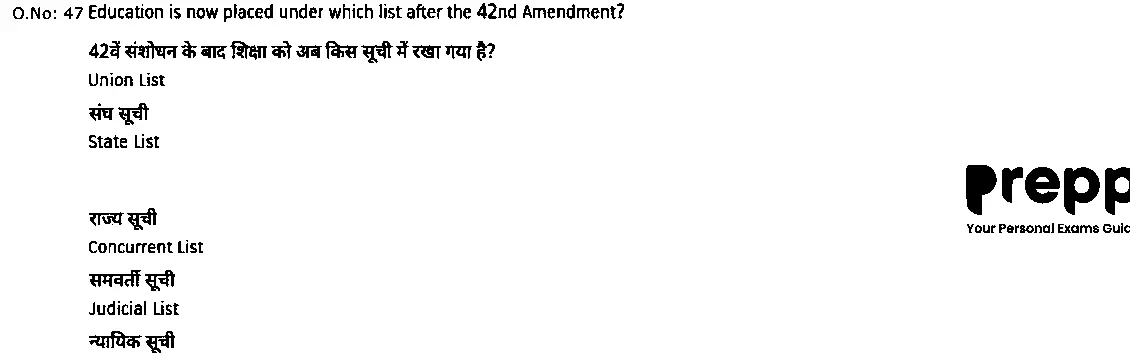
- A
Option A (shown in the question image)
- B
Option B (shown in the question image)
- C
Option C (shown in the question image)
- D
Option D (shown in the question image)
Show answer
C. Option C (shown in the question image)The marked option was checked against the archived source PDF. A worked explanation is not provided.
Paper & answer key PDF ↗ Question 48archived
Use the answer-neutral rendering of the archived question below.

- A
Option A (shown in the question image)
- B
Option B (shown in the question image)
- C
Option C (shown in the question image)
- D
Option D (shown in the question image)
Show answer
C. Option C (shown in the question image)The marked option was checked against the archived source PDF. A worked explanation is not provided.
Paper & answer key PDF ↗ Question 49archived
Use the answer-neutral rendering of the archived question below.
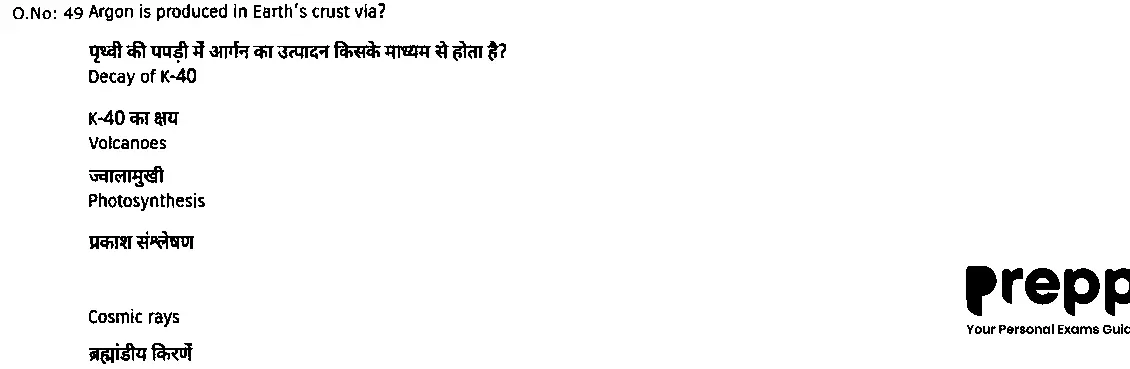
- A
Option A (shown in the question image)
- B
Option B (shown in the question image)
- C
Option C (shown in the question image)
- D
Option D (shown in the question image)
Show answer
A. Option A (shown in the question image)The marked option was checked against the archived source PDF. A worked explanation is not provided.
Paper & answer key PDF ↗ Question 50archived
Use the answer-neutral rendering of the archived question below.
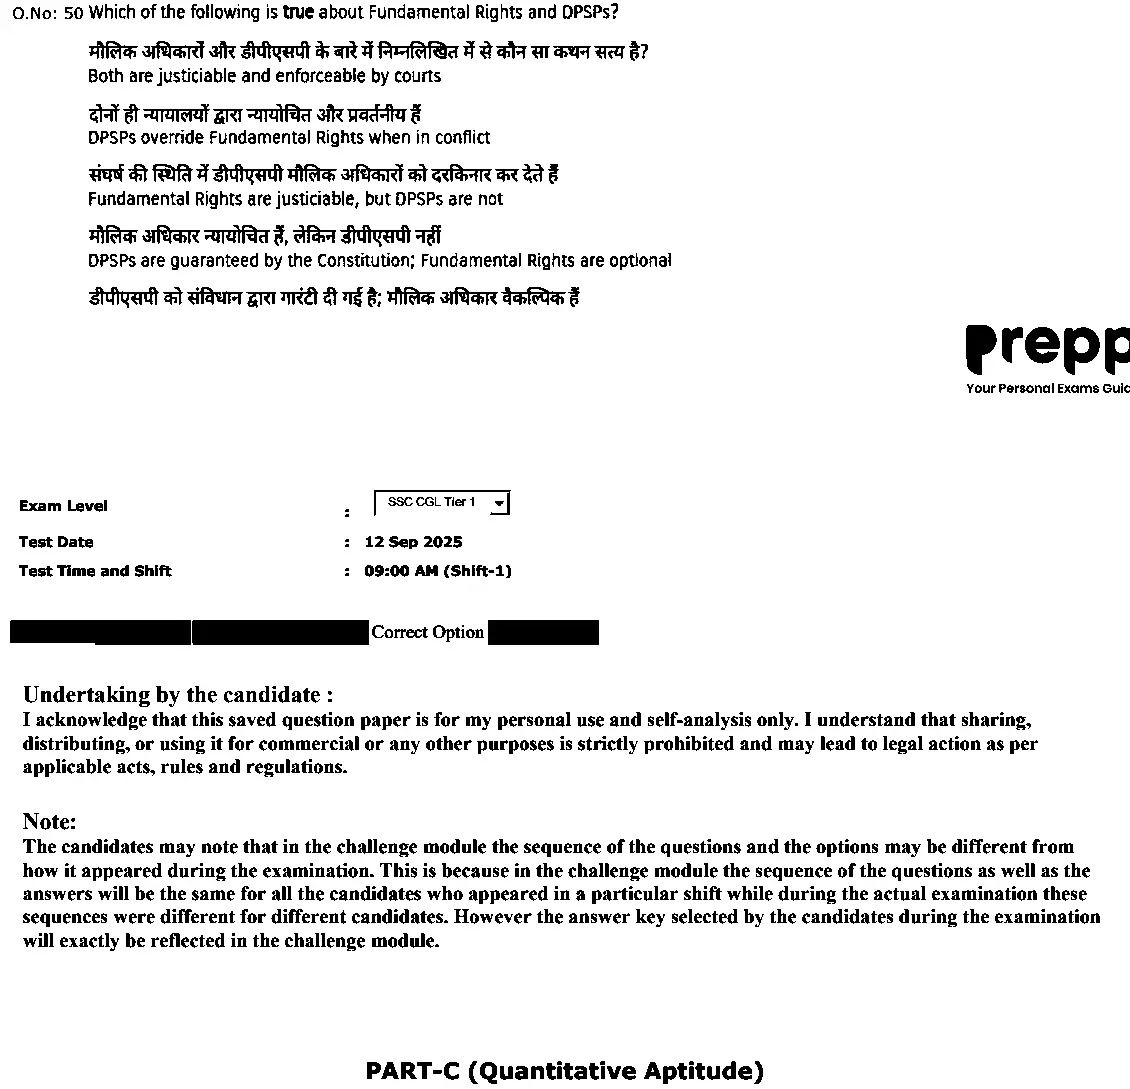
- A
Option A (shown in the question image)
- B
Option B (shown in the question image)
- C
Option C (shown in the question image)
- D
Option D (shown in the question image)
Show answer
C. Option C (shown in the question image)The marked option was checked against the archived source PDF. A worked explanation is not provided.
Paper & answer key PDF ↗ Question 51archived
Use the answer-neutral rendering of the archived question below.
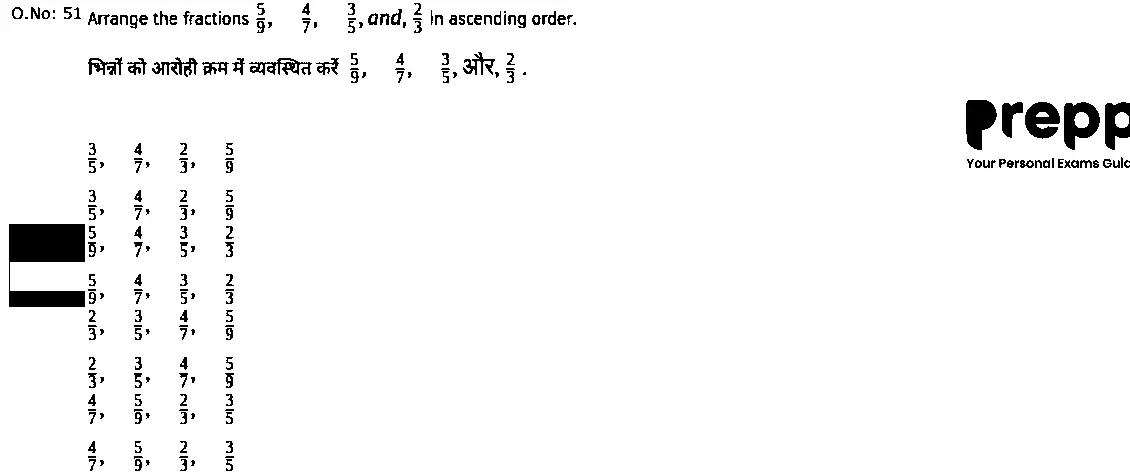
- A
Option A (shown in the question image)
- B
Option B (shown in the question image)
- C
Option C (shown in the question image)
- D
Option D (shown in the question image)
Show answer
B. Option B (shown in the question image)The marked option was checked against the archived source PDF. A worked explanation is not provided.
Paper & answer key PDF ↗ Question 52archived
Use the answer-neutral rendering of the archived question below.
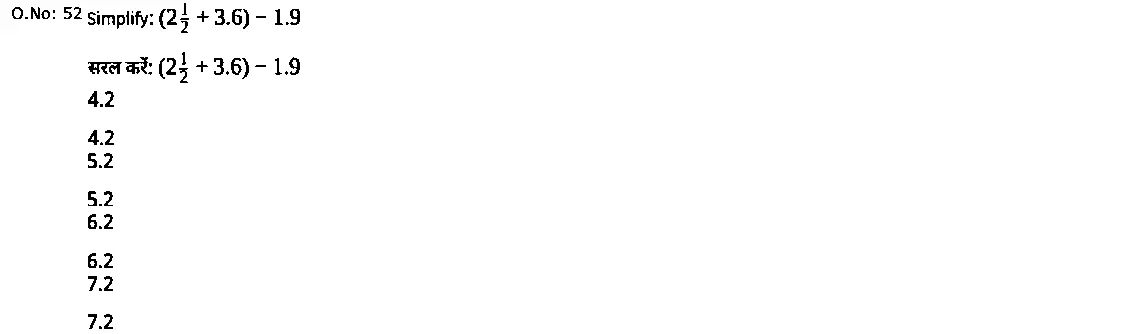
- A
Option A (shown in the question image)
- B
Option B (shown in the question image)
- C
Option C (shown in the question image)
- D
Option D (shown in the question image)
Show answer
A. Option A (shown in the question image)The marked option was checked against the archived source PDF. A worked explanation is not provided.
Paper & answer key PDF ↗ Question 53archived
Use the answer-neutral rendering of the archived question below.
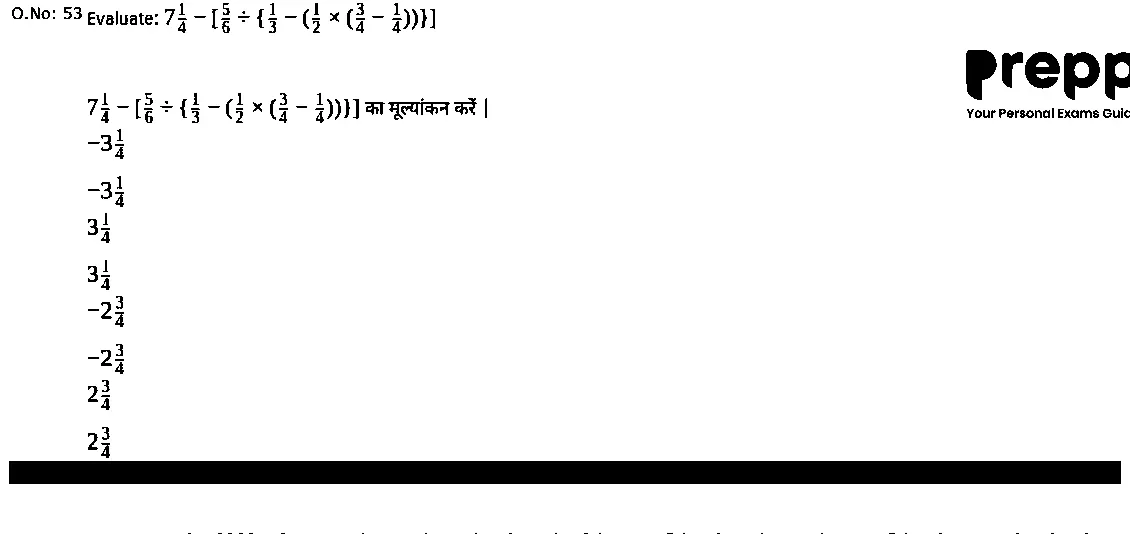
- A
Option A (shown in the question image)
- B
Option B (shown in the question image)
- C
Option C (shown in the question image)
- D
Option D (shown in the question image)
Show answer
C. Option C (shown in the question image)The marked option was checked against the archived source PDF. A worked explanation is not provided.
Paper & answer key PDF ↗ Question 54archived
Use the answer-neutral rendering of the archived question below.
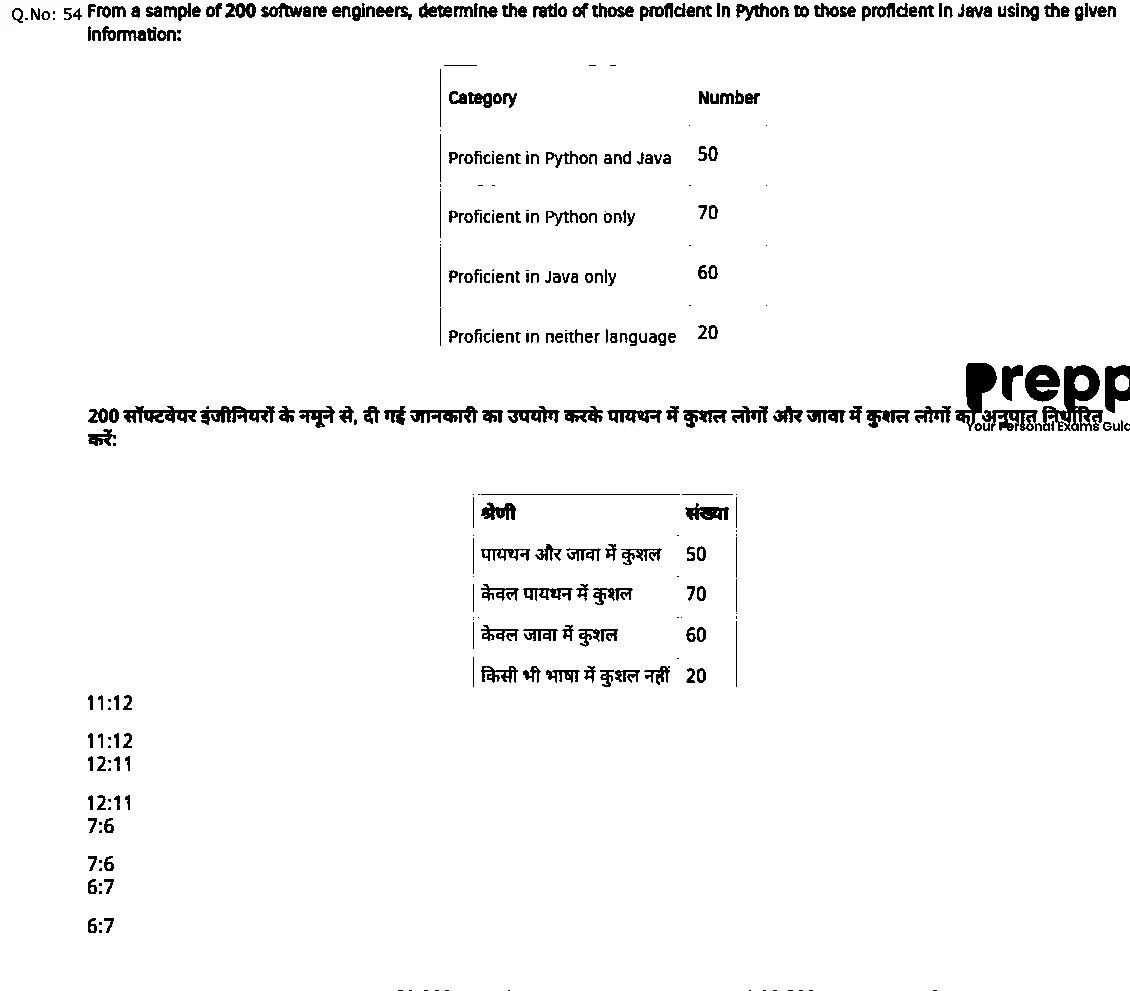
- A
Option A (shown in the question image)
- B
Option B (shown in the question image)
- C
Option C (shown in the question image)
- D
Option D (shown in the question image)
Show answer
B. Option B (shown in the question image)The marked option was checked against the archived source PDF. A worked explanation is not provided.
Paper & answer key PDF ↗ Question 55archived
Use the answer-neutral rendering of the archived question below.
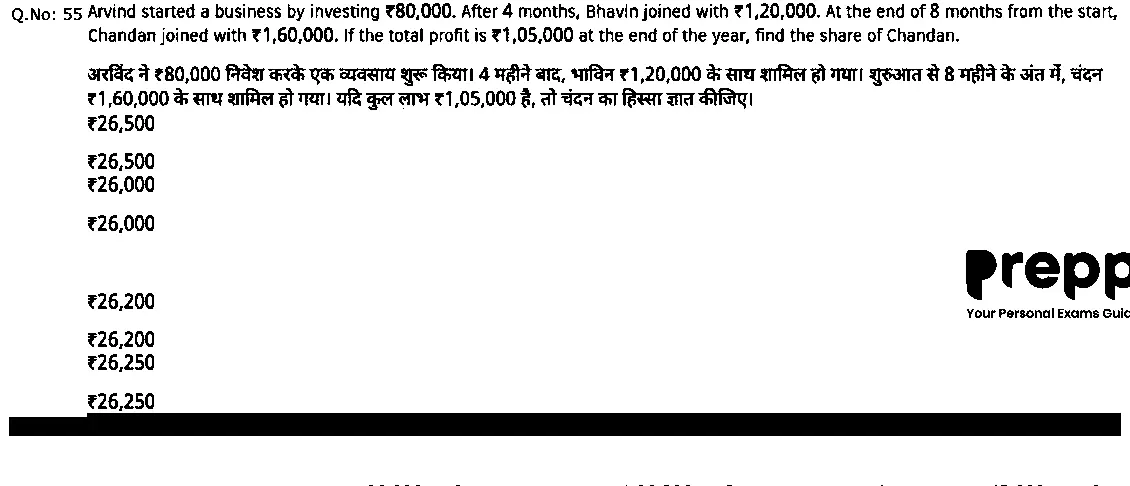
- A
Option A (shown in the question image)
- B
Option B (shown in the question image)
- C
Option C (shown in the question image)
- D
Option D (shown in the question image)
Show answer
D. Option D (shown in the question image)The marked option was checked against the archived source PDF. A worked explanation is not provided.
Paper & answer key PDF ↗ Question 56archived
Use the answer-neutral rendering of the archived question below.
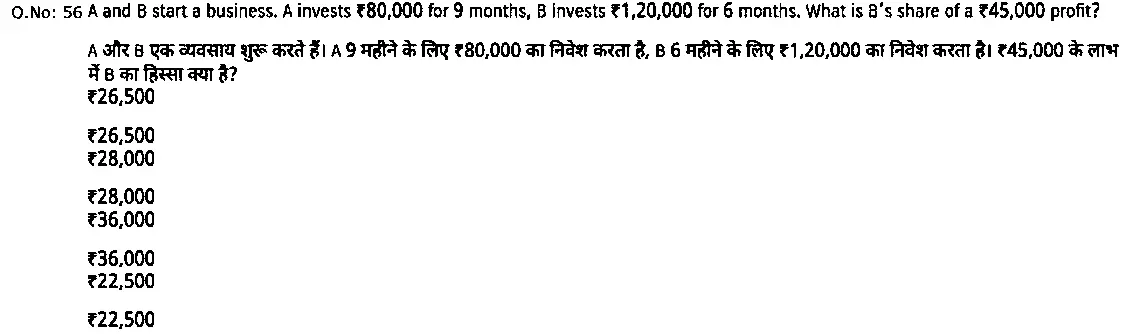
- A
Option A (shown in the question image)
- B
Option B (shown in the question image)
- C
Option C (shown in the question image)
- D
Option D (shown in the question image)
Show answer
D. Option D (shown in the question image)The marked option was checked against the archived source PDF. A worked explanation is not provided.
Paper & answer key PDF ↗ Question 57archived
Use the answer-neutral rendering of the archived question below.
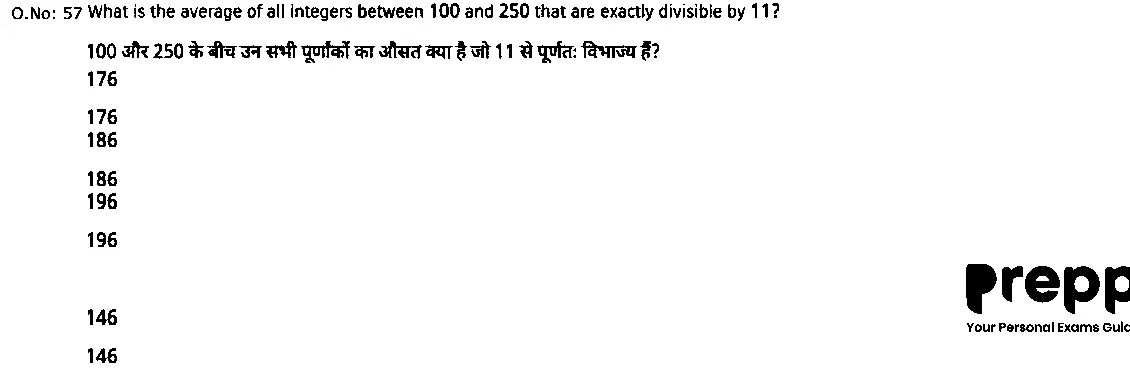
- A
Option A (shown in the question image)
- B
Option B (shown in the question image)
- C
Option C (shown in the question image)
- D
Option D (shown in the question image)
Show answer
A. Option A (shown in the question image)The marked option was checked against the archived source PDF. A worked explanation is not provided.
Paper & answer key PDF ↗ Question 58archived
Use the answer-neutral rendering of the archived question below.
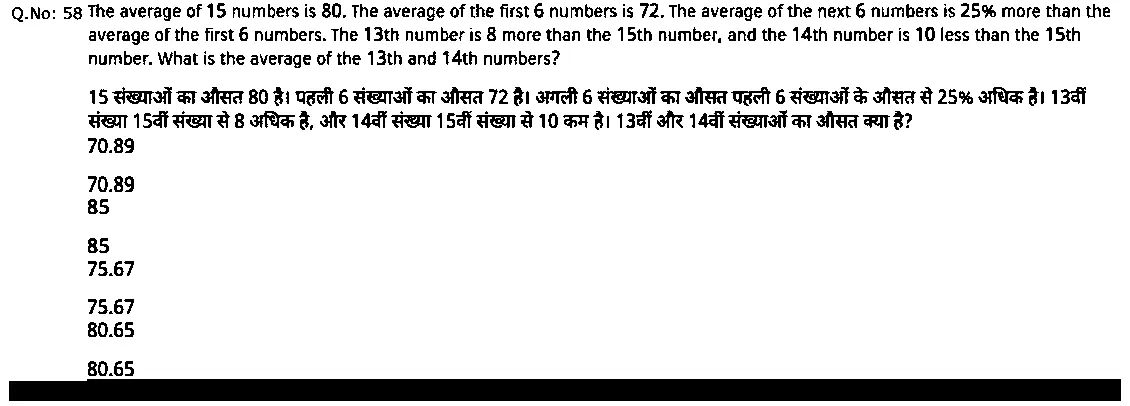
- A
Option A (shown in the question image)
- B
Option B (shown in the question image)
- C
Option C (shown in the question image)
- D
Option D (shown in the question image)
Show answer
C. Option C (shown in the question image)The marked option was checked against the archived source PDF. A worked explanation is not provided.
Paper & answer key PDF ↗ Question 59archived
Use the answer-neutral rendering of the archived question below.
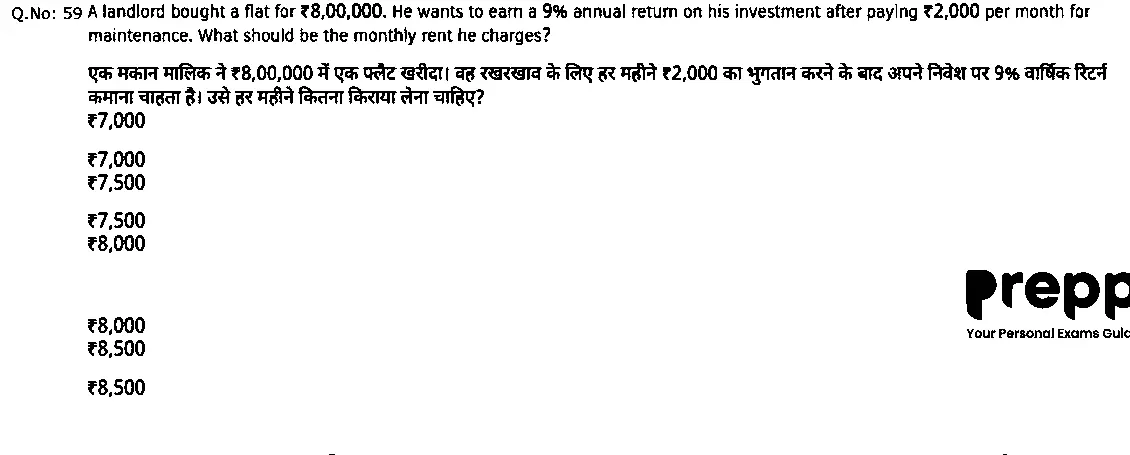
- A
Option A (shown in the question image)
- B
Option B (shown in the question image)
- C
Option C (shown in the question image)
- D
Option D (shown in the question image)
Show answer
C. Option C (shown in the question image)The marked option was checked against the archived source PDF. A worked explanation is not provided.
Paper & answer key PDF ↗ Question 60archived
Use the answer-neutral rendering of the archived question below.
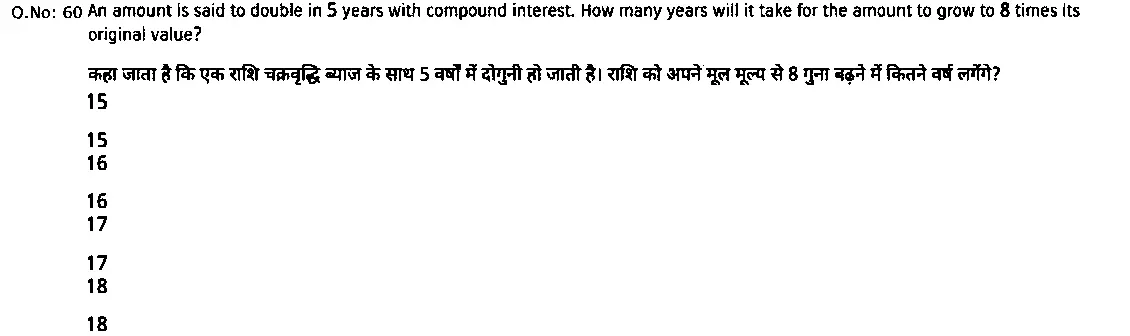
- A
Option A (shown in the question image)
- B
Option B (shown in the question image)
- C
Option C (shown in the question image)
- D
Option D (shown in the question image)
Show answer
A. Option A (shown in the question image)The marked option was checked against the archived source PDF. A worked explanation is not provided.
Paper & answer key PDF ↗ Question 61archived
Use the answer-neutral rendering of the archived question below.
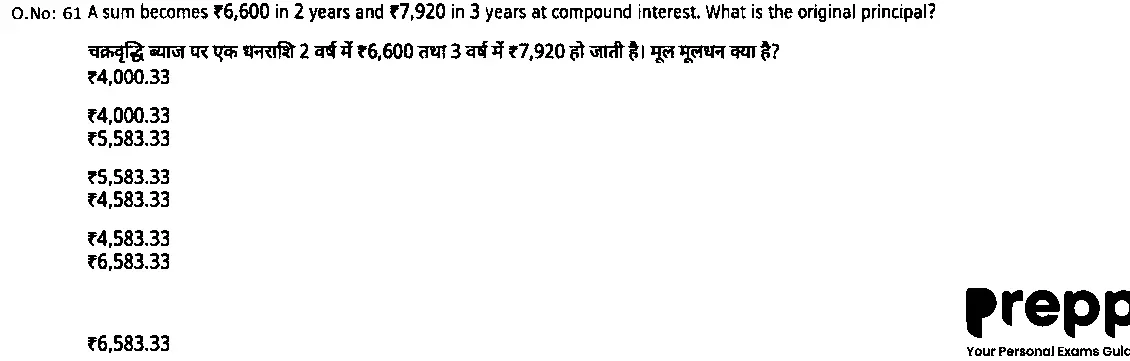
- A
Option A (shown in the question image)
- B
Option B (shown in the question image)
- C
Option C (shown in the question image)
- D
Option D (shown in the question image)
Show answer
C. Option C (shown in the question image)The marked option was checked against the archived source PDF. A worked explanation is not provided.
Paper & answer key PDF ↗ Question 62archived
Use the answer-neutral rendering of the archived question below.
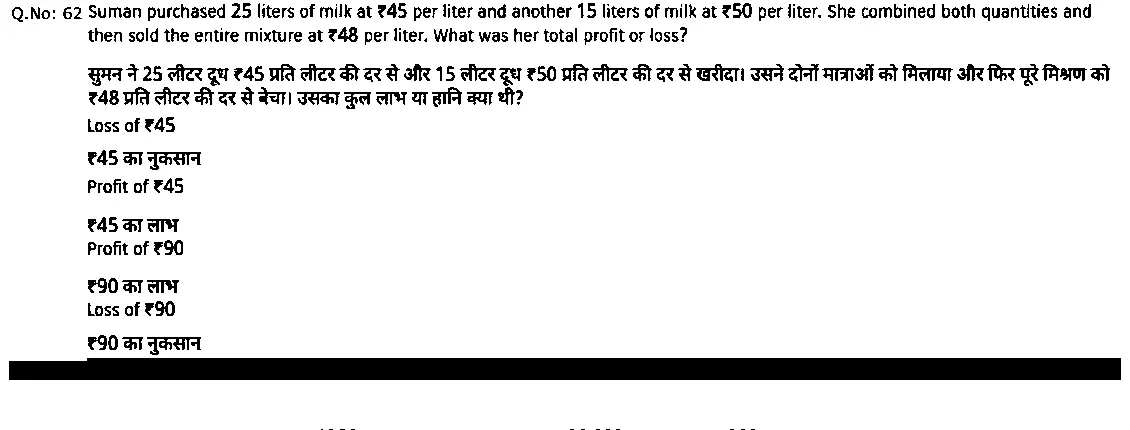
- A
Option A (shown in the question image)
- B
Option B (shown in the question image)
- C
Option C (shown in the question image)
- D
Option D (shown in the question image)
Show answer
B. Option B (shown in the question image)The marked option was checked against the archived source PDF. A worked explanation is not provided.
Paper & answer key PDF ↗ Question 63archived
Use the answer-neutral rendering of the archived question below.
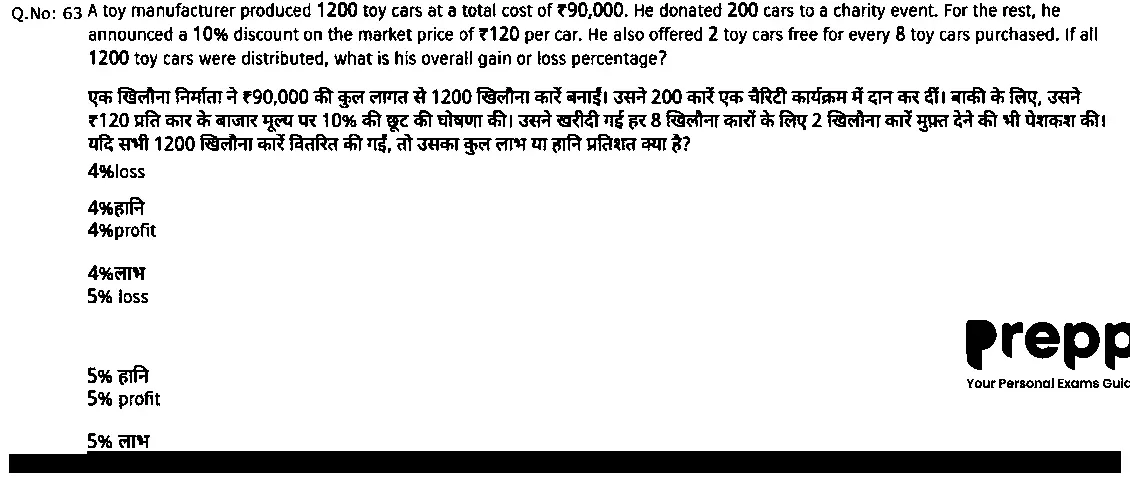
- A
Option A (shown in the question image)
- B
Option B (shown in the question image)
- C
Option C (shown in the question image)
- D
Option D (shown in the question image)
Show answer
A. Option A (shown in the question image)The marked option was checked against the archived source PDF. A worked explanation is not provided.
Paper & answer key PDF ↗ Question 64archived
Use the answer-neutral rendering of the archived question below.
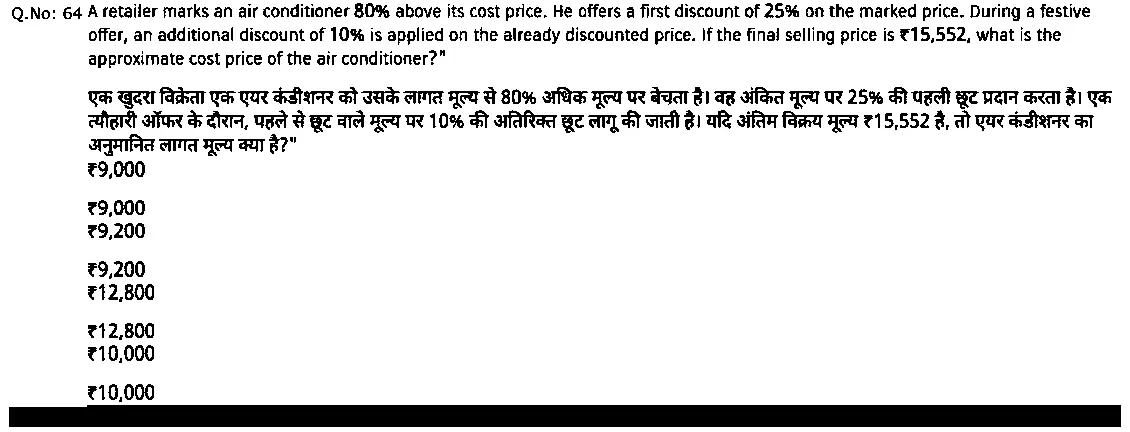
- A
Option A (shown in the question image)
- B
Option B (shown in the question image)
- C
Option C (shown in the question image)
- D
Option D (shown in the question image)
Show answer
C. Option C (shown in the question image)The marked option was checked against the archived source PDF. A worked explanation is not provided.
Paper & answer key PDF ↗ Question 65archived
Use the answer-neutral rendering of the archived question below.
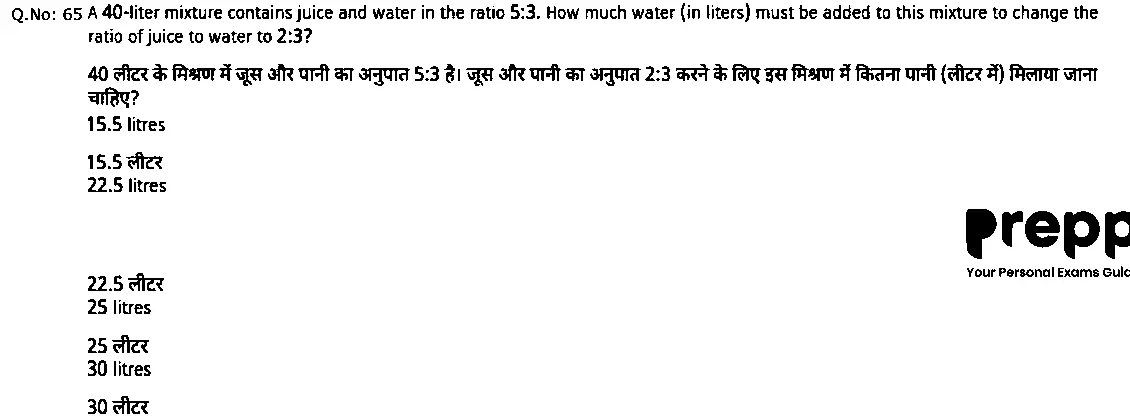
- A
Option A (shown in the question image)
- B
Option B (shown in the question image)
- C
Option C (shown in the question image)
- D
Option D (shown in the question image)
Show answer
B. Option B (shown in the question image)The marked option was checked against the archived source PDF. A worked explanation is not provided.
Paper & answer key PDF ↗ Question 66archived
Use the answer-neutral rendering of the archived question below.
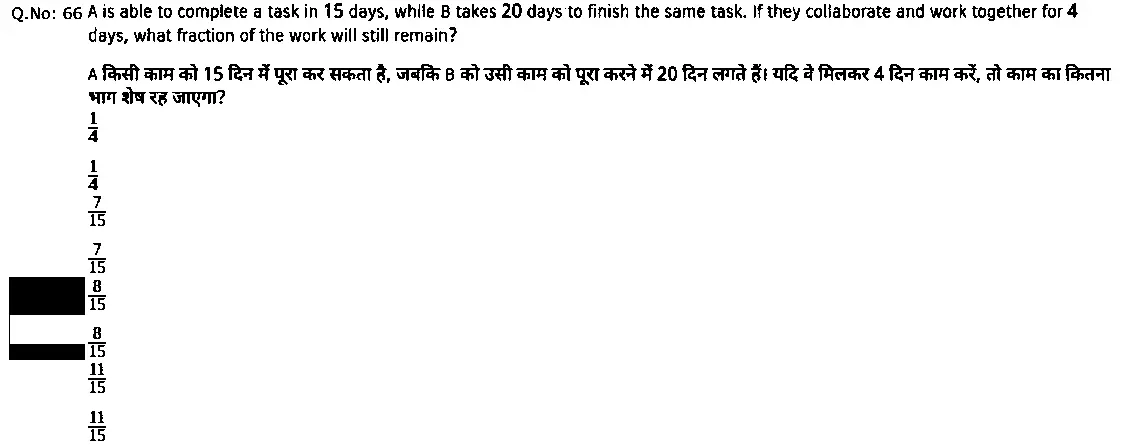
- A
Option A (shown in the question image)
- B
Option B (shown in the question image)
- C
Option C (shown in the question image)
- D
Option D (shown in the question image)
Show answer
C. Option C (shown in the question image)The marked option was checked against the archived source PDF. A worked explanation is not provided.
Paper & answer key PDF ↗ Question 67archived
Use the answer-neutral rendering of the archived question below.
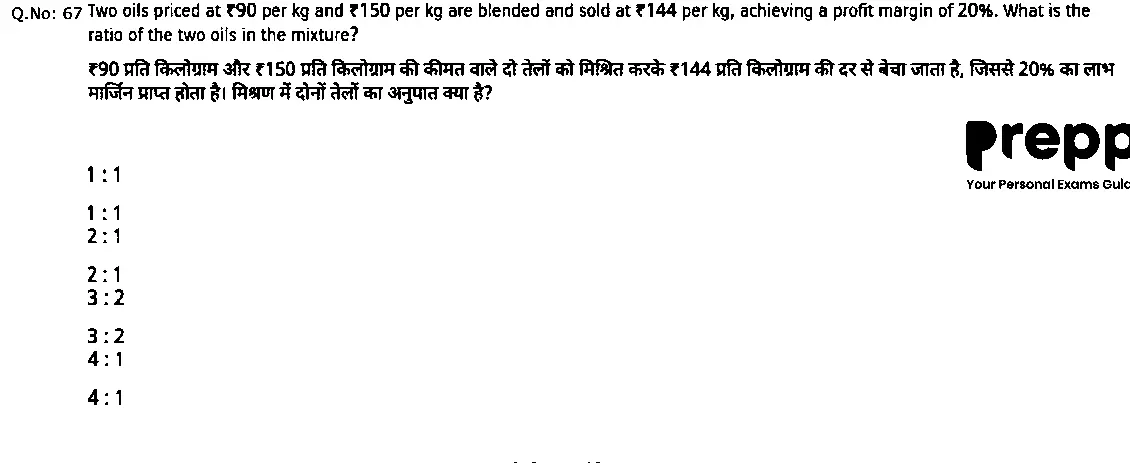
- A
Option A (shown in the question image)
- B
Option B (shown in the question image)
- C
Option C (shown in the question image)
- D
Option D (shown in the question image)
Show answer
A. Option A (shown in the question image)The marked option was checked against the archived source PDF. A worked explanation is not provided.
Paper & answer key PDF ↗ Question 68archived
Use the answer-neutral rendering of the archived question below.
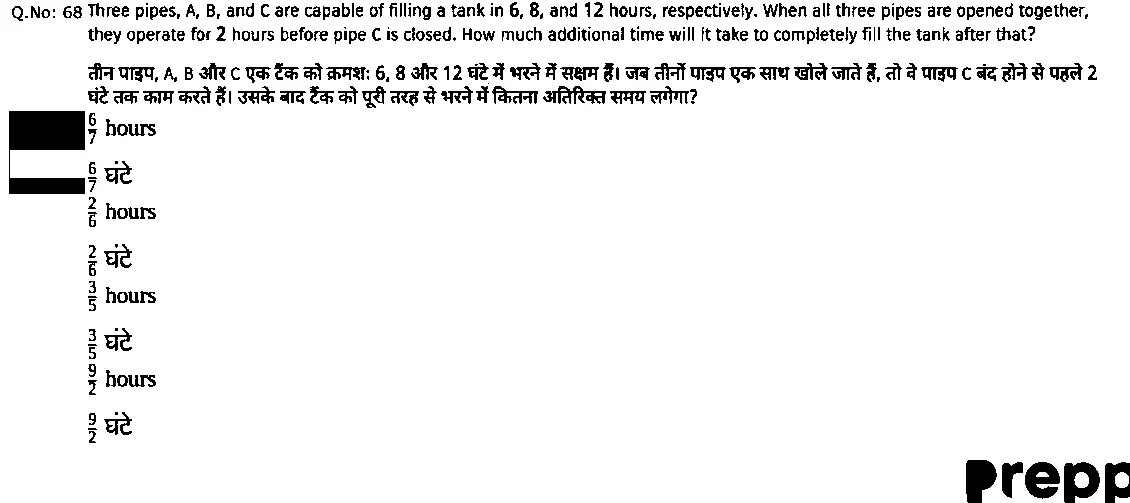
- A
Option A (shown in the question image)
- B
Option B (shown in the question image)
- C
Option C (shown in the question image)
- D
Option D (shown in the question image)
Show answer
A. Option A (shown in the question image)The marked option was checked against the archived source PDF. A worked explanation is not provided.
Paper & answer key PDF ↗ Question 69archived
Use the answer-neutral rendering of the archived question below.
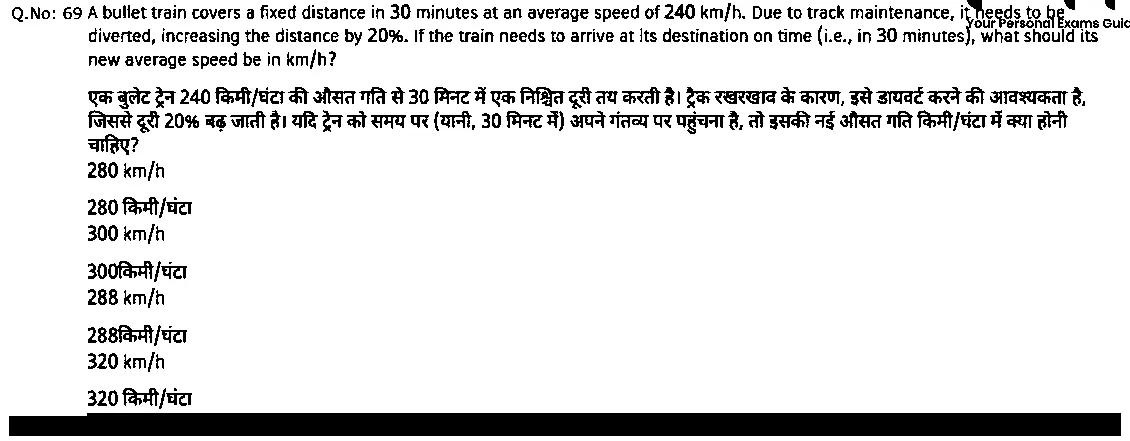
- A
Option A (shown in the question image)
- B
Option B (shown in the question image)
- C
Option C (shown in the question image)
- D
Option D (shown in the question image)
Show answer
C. Option C (shown in the question image)The marked option was checked against the archived source PDF. A worked explanation is not provided.
Paper & answer key PDF ↗ Question 70archived
Use the answer-neutral rendering of the archived question below.
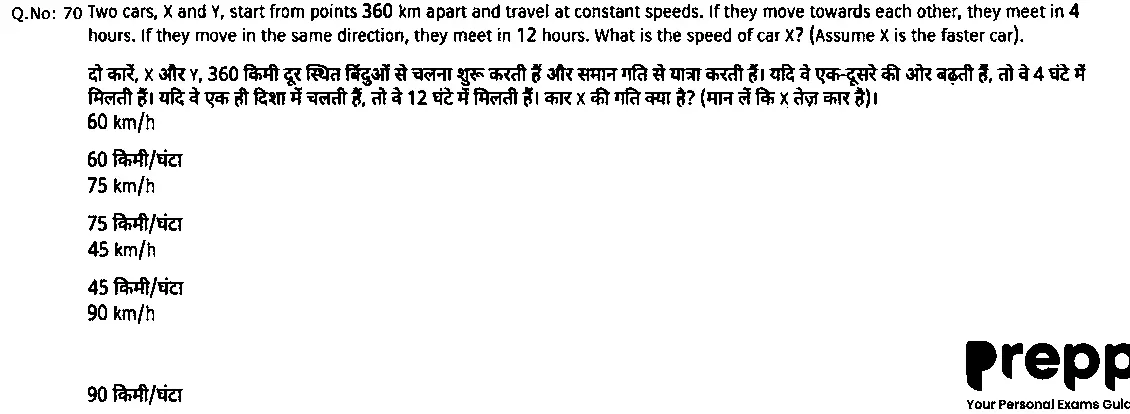
- A
Option A (shown in the question image)
- B
Option B (shown in the question image)
- C
Option C (shown in the question image)
- D
Option D (shown in the question image)
Show answer
A. Option A (shown in the question image)The marked option was checked against the archived source PDF. A worked explanation is not provided.
Paper & answer key PDF ↗ Question 71archived
Use the answer-neutral rendering of the archived question below.
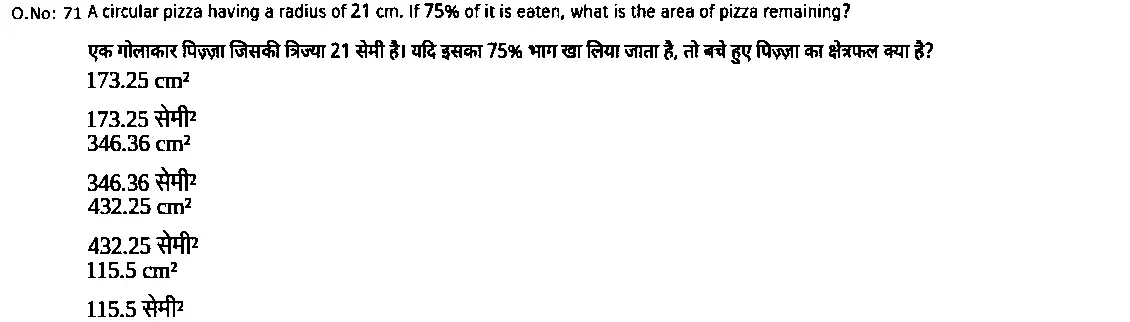
- A
Option A (shown in the question image)
- B
Option B (shown in the question image)
- C
Option C (shown in the question image)
- D
Option D (shown in the question image)
Show answer
B. Option B (shown in the question image)The marked option was checked against the archived source PDF. A worked explanation is not provided.
Paper & answer key PDF ↗ Question 72archived
Use the answer-neutral rendering of the archived question below.
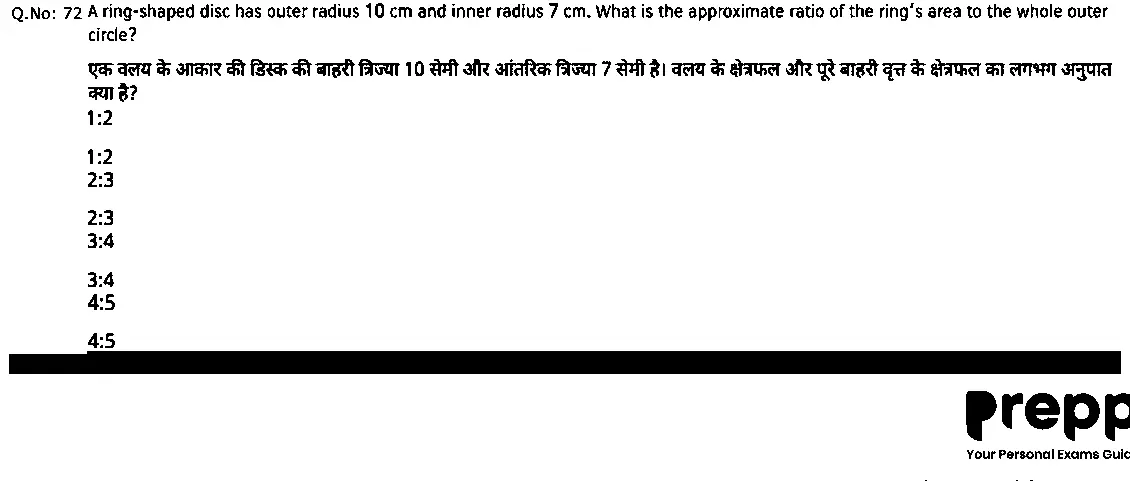
- A
Option A (shown in the question image)
- B
Option B (shown in the question image)
- C
Option C (shown in the question image)
- D
Option D (shown in the question image)
Show answer
A. Option A (shown in the question image)The marked option was checked against the archived source PDF. A worked explanation is not provided.
Paper & answer key PDF ↗ Question 73archived
Use the answer-neutral rendering of the archived question below.
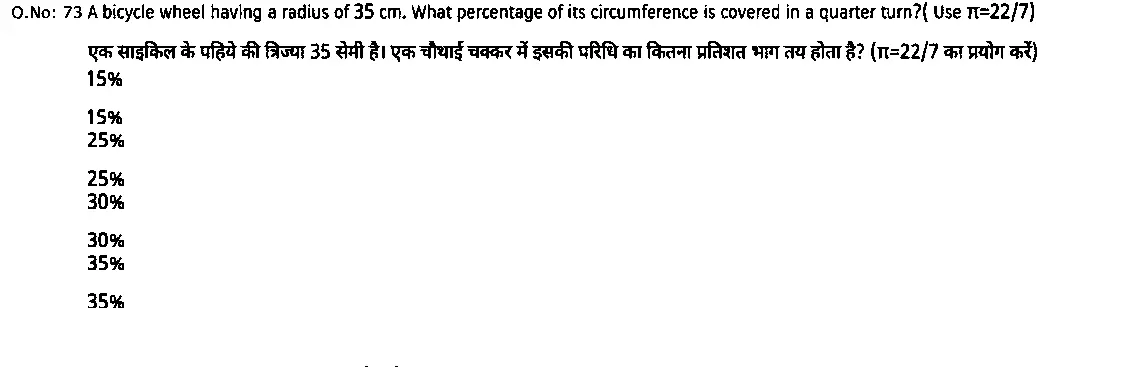
- A
Option A (shown in the question image)
- B
Option B (shown in the question image)
- C
Option C (shown in the question image)
- D
Option D (shown in the question image)
Show answer
B. Option B (shown in the question image)The marked option was checked against the archived source PDF. A worked explanation is not provided.
Paper & answer key PDF ↗ Question 74archived
Use the answer-neutral rendering of the archived question below.
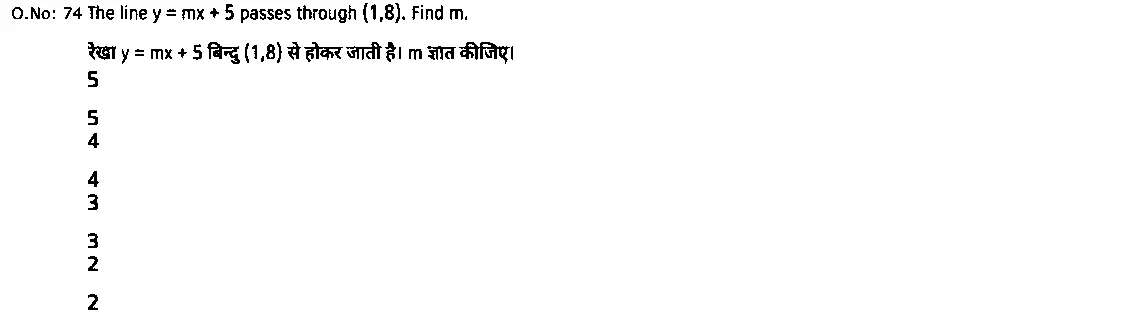
- A
Option A (shown in the question image)
- B
Option B (shown in the question image)
- C
Option C (shown in the question image)
- D
Option D (shown in the question image)
Show answer
C. Option C (shown in the question image)The marked option was checked against the archived source PDF. A worked explanation is not provided.
Paper & answer key PDF ↗ Question 75archived
Use the answer-neutral rendering of the archived question below.
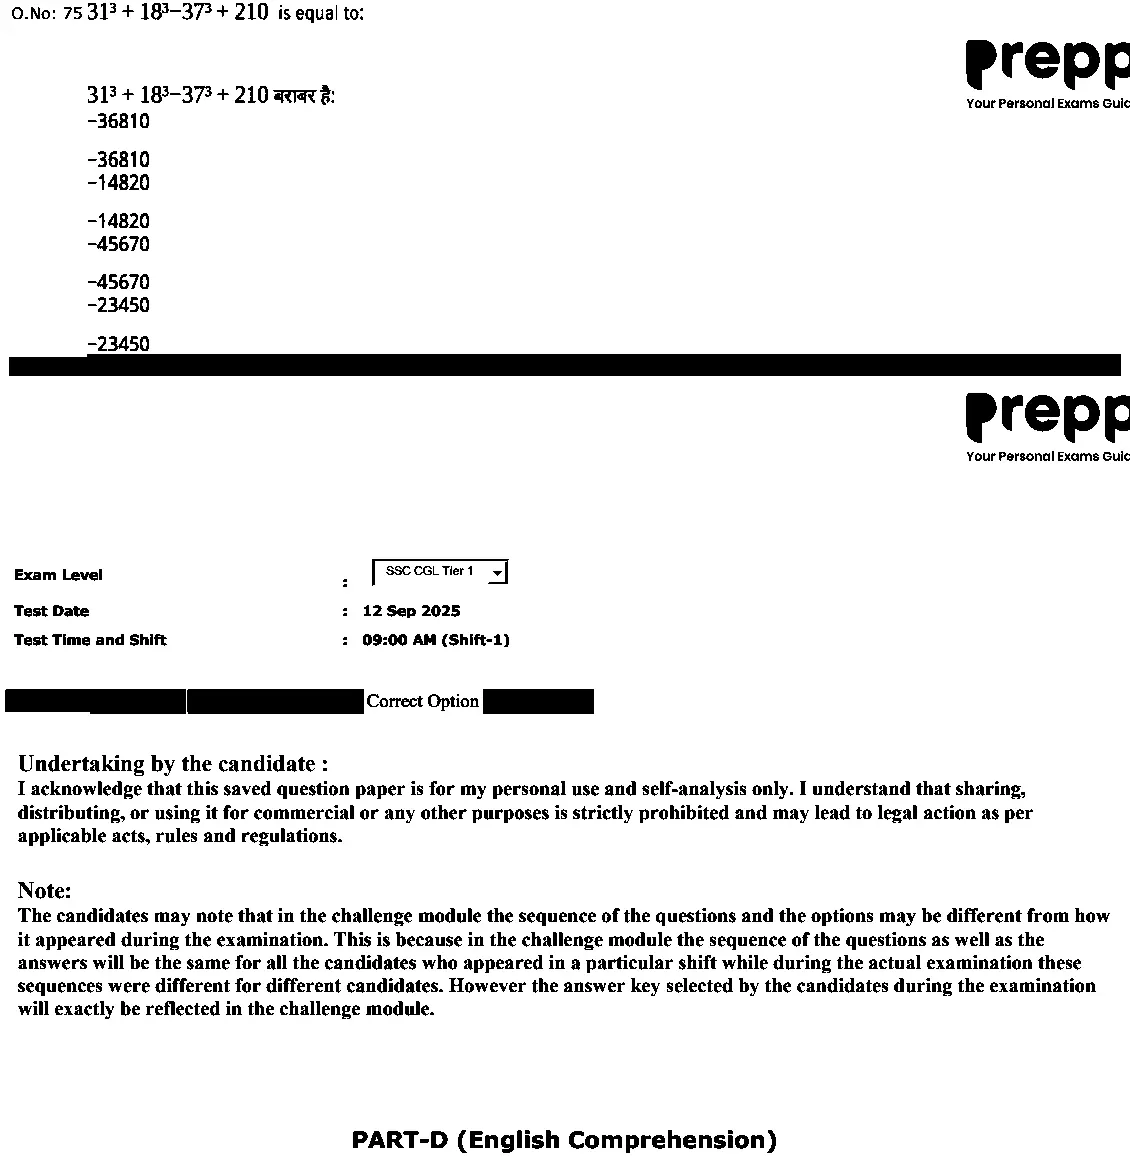
- A
Option A (shown in the question image)
- B
Option B (shown in the question image)
- C
Option C (shown in the question image)
- D
Option D (shown in the question image)
Show answer
B. Option B (shown in the question image)The marked option was checked against the archived source PDF. A worked explanation is not provided.
Paper & answer key PDF ↗ Question 76archived
Use the answer-neutral rendering of the archived question below.

- A
Option A (shown in the question image)
- B
Option B (shown in the question image)
- C
Option C (shown in the question image)
- D
Option D (shown in the question image)
Show answer
C. Option C (shown in the question image)The marked option was checked against the archived source PDF. A worked explanation is not provided.
Paper & answer key PDF ↗ Question 77archived
Use the answer-neutral rendering of the archived question below.

- A
Option A (shown in the question image)
- B
Option B (shown in the question image)
- C
Option C (shown in the question image)
- D
Option D (shown in the question image)
Show answer
C. Option C (shown in the question image)The marked option was checked against the archived source PDF. A worked explanation is not provided.
Paper & answer key PDF ↗ Question 78archived
Use the answer-neutral rendering of the archived question below.

- A
Option A (shown in the question image)
- B
Option B (shown in the question image)
- C
Option C (shown in the question image)
- D
Option D (shown in the question image)
Show answer
C. Option C (shown in the question image)The marked option was checked against the archived source PDF. A worked explanation is not provided.
Paper & answer key PDF ↗ Question 79archived
Use the answer-neutral rendering of the archived question below.
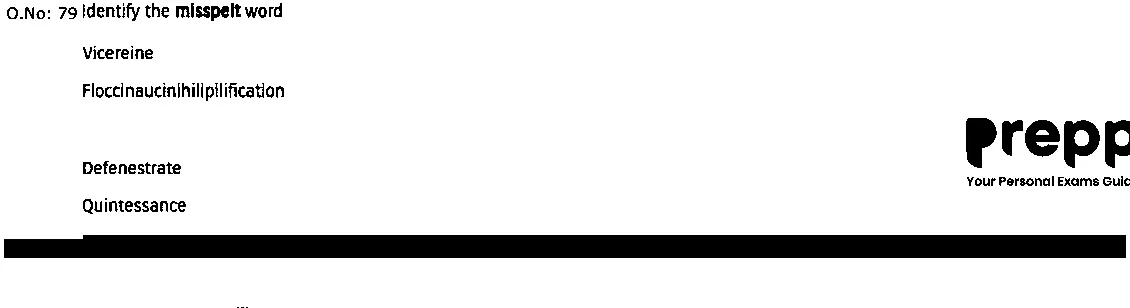
- A
Option A (shown in the question image)
- B
Option B (shown in the question image)
- C
Option C (shown in the question image)
- D
Option D (shown in the question image)
Show answer
D. Option D (shown in the question image)The marked option was checked against the archived source PDF. A worked explanation is not provided.
Paper & answer key PDF ↗ Question 80archived
Use the answer-neutral rendering of the archived question below.

- A
Option A (shown in the question image)
- B
Option B (shown in the question image)
- C
Option C (shown in the question image)
- D
Option D (shown in the question image)
Show answer
A. Option A (shown in the question image)The marked option was checked against the archived source PDF. A worked explanation is not provided.
Paper & answer key PDF ↗ Question 81archived
Use the answer-neutral rendering of the archived question below.

- A
Option A (shown in the question image)
- B
Option B (shown in the question image)
- C
Option C (shown in the question image)
- D
Option D (shown in the question image)
Show answer
C. Option C (shown in the question image)The marked option was checked against the archived source PDF. A worked explanation is not provided.
Paper & answer key PDF ↗ Question 82archived
Use the answer-neutral rendering of the archived question below.

- A
Option A (shown in the question image)
- B
Option B (shown in the question image)
- C
Option C (shown in the question image)
- D
Option D (shown in the question image)
Show answer
A. Option A (shown in the question image)The marked option was checked against the archived source PDF. A worked explanation is not provided.
Paper & answer key PDF ↗ Question 83archived
Use the answer-neutral rendering of the archived question below.

- A
Option A (shown in the question image)
- B
Option B (shown in the question image)
- C
Option C (shown in the question image)
- D
Option D (shown in the question image)
Show answer
D. Option D (shown in the question image)The marked option was checked against the archived source PDF. A worked explanation is not provided.
Paper & answer key PDF ↗ Question 84archived
Use the answer-neutral rendering of the archived question below.

- A
Option A (shown in the question image)
- B
Option B (shown in the question image)
- C
Option C (shown in the question image)
- D
Option D (shown in the question image)
Show answer
B. Option B (shown in the question image)The marked option was checked against the archived source PDF. A worked explanation is not provided.
Paper & answer key PDF ↗ Question 85archived
Use the answer-neutral rendering of the archived question below.
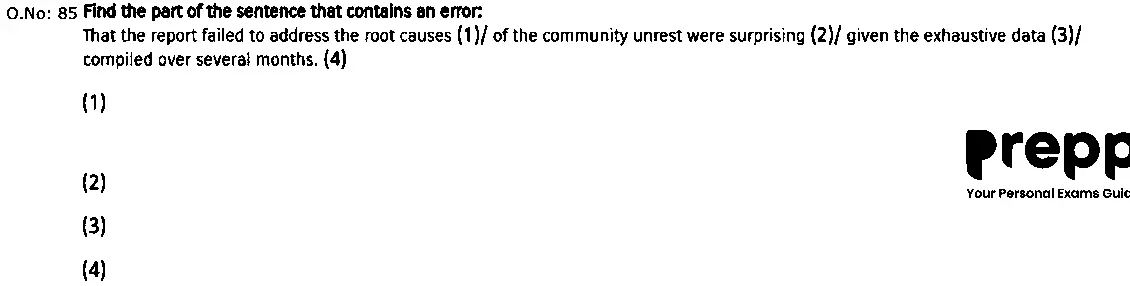
- A
Option A (shown in the question image)
- B
Option B (shown in the question image)
- C
Option C (shown in the question image)
- D
Option D (shown in the question image)
Show answer
B. Option B (shown in the question image)The marked option was checked against the archived source PDF. A worked explanation is not provided.
Paper & answer key PDF ↗ Question 86archived
Use the answer-neutral rendering of the archived question below.
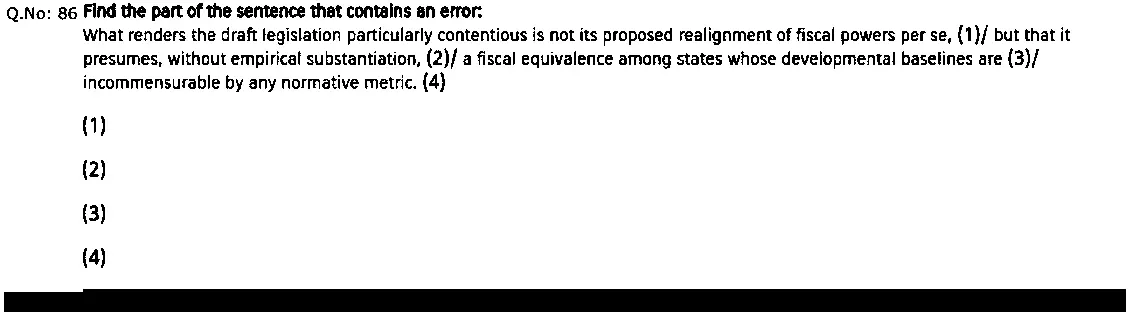
- A
Option A (shown in the question image)
- B
Option B (shown in the question image)
- C
Option C (shown in the question image)
- D
Option D (shown in the question image)
Show answer
B. Option B (shown in the question image)The marked option was checked against the archived source PDF. A worked explanation is not provided.
Paper & answer key PDF ↗ Question 87archived
Use the answer-neutral rendering of the archived question below.
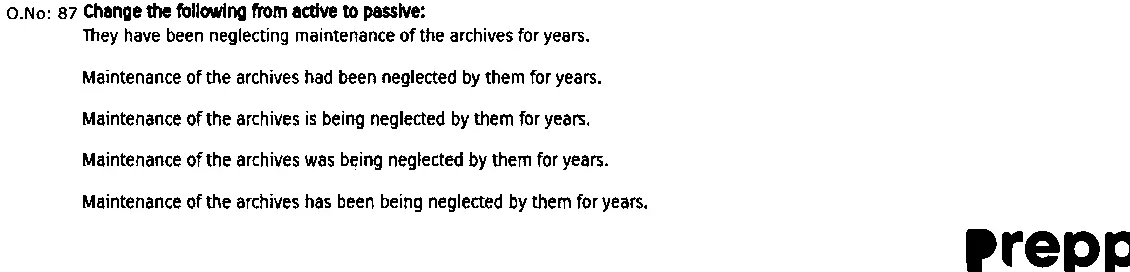
- A
Option A (shown in the question image)
- B
Option B (shown in the question image)
- C
Option C (shown in the question image)
- D
Option D (shown in the question image)
Show answer
D. Option D (shown in the question image)The marked option was checked against the archived source PDF. A worked explanation is not provided.
Paper & answer key PDF ↗ Question 88archived
Use the answer-neutral rendering of the archived question below.
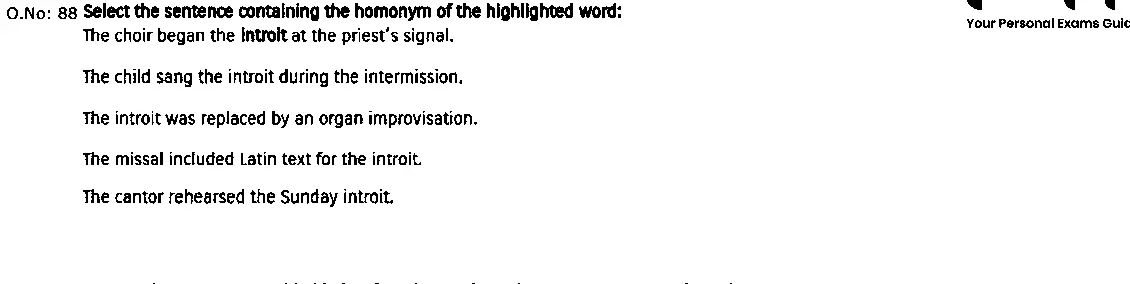
- A
Option A (shown in the question image)
- B
Option B (shown in the question image)
- C
Option C (shown in the question image)
- D
Option D (shown in the question image)
Show answer
A. Option A (shown in the question image)The marked option was checked against the archived source PDF. A worked explanation is not provided.
Paper & answer key PDF ↗ Question 89archived
Use the answer-neutral rendering of the archived question below.
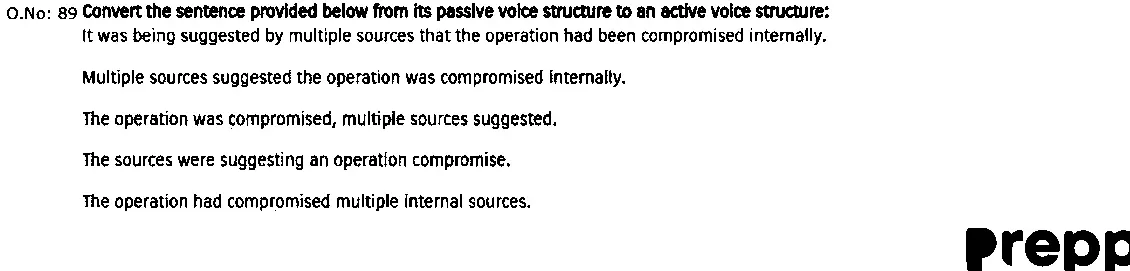
- A
Option A (shown in the question image)
- B
Option B (shown in the question image)
- C
Option C (shown in the question image)
- D
Option D (shown in the question image)
Show answer
A. Option A (shown in the question image)The marked option was checked against the archived source PDF. A worked explanation is not provided.
Paper & answer key PDF ↗ Question 90archived
Use the answer-neutral rendering of the archived question below.
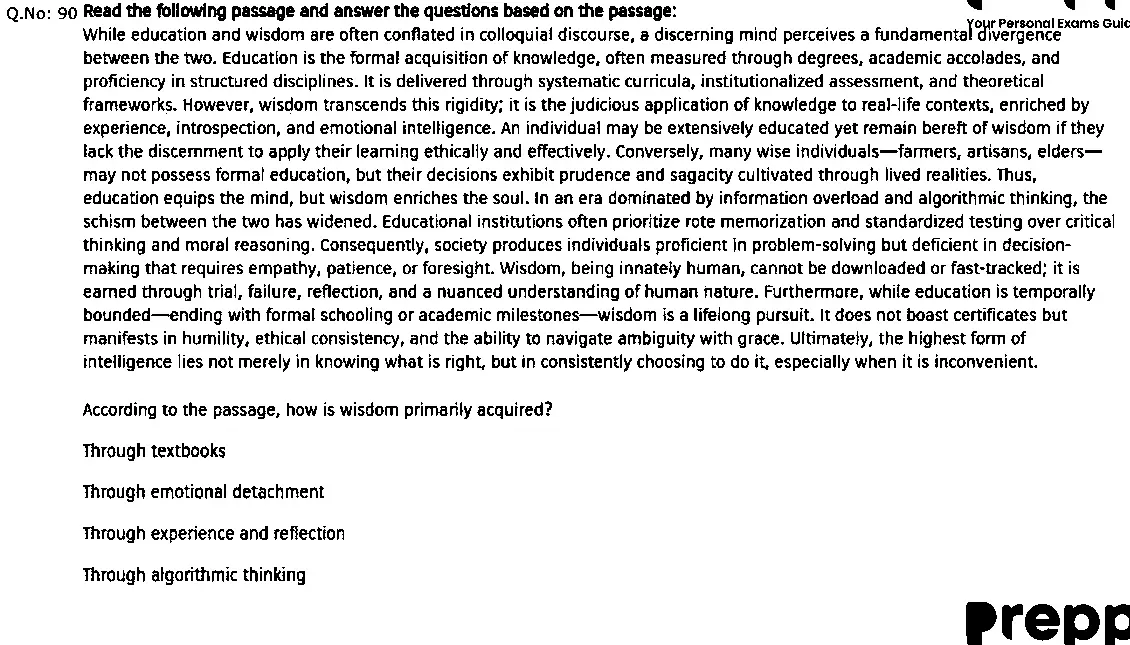
- A
Option A (shown in the question image)
- B
Option B (shown in the question image)
- C
Option C (shown in the question image)
- D
Option D (shown in the question image)
Show answer
C. Option C (shown in the question image)The marked option was checked against the archived source PDF. A worked explanation is not provided.
Paper & answer key PDF ↗ Question 91archived
Use the answer-neutral rendering of the archived question below.
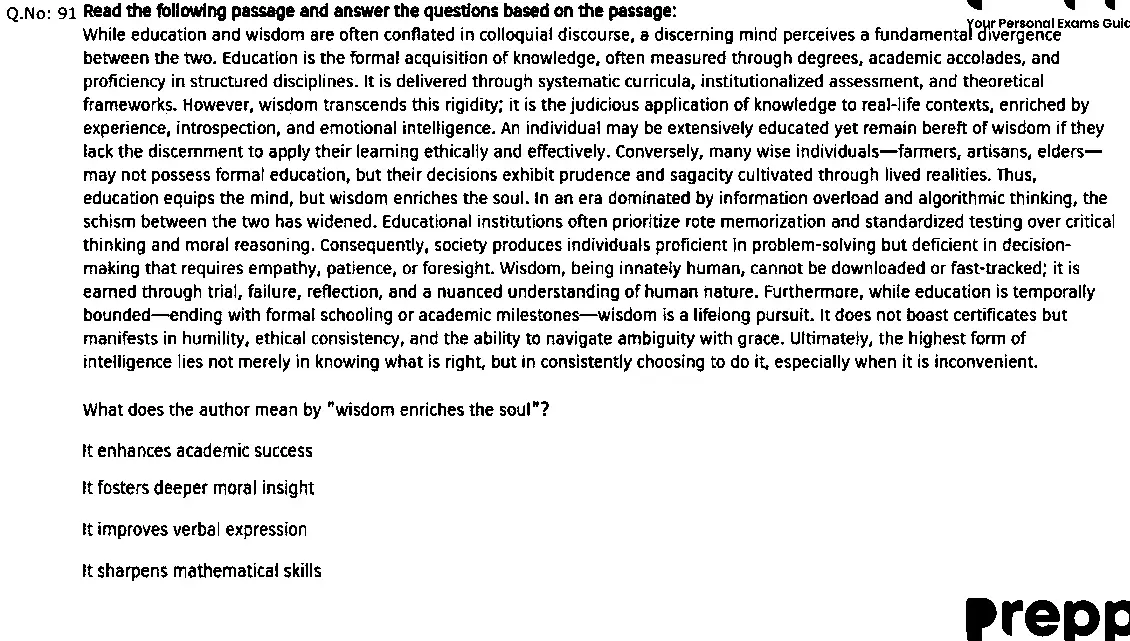
- A
Option A (shown in the question image)
- B
Option B (shown in the question image)
- C
Option C (shown in the question image)
- D
Option D (shown in the question image)
Show answer
B. Option B (shown in the question image)The marked option was checked against the archived source PDF. A worked explanation is not provided.
Paper & answer key PDF ↗ Question 92archived
Use the answer-neutral rendering of the archived question below.
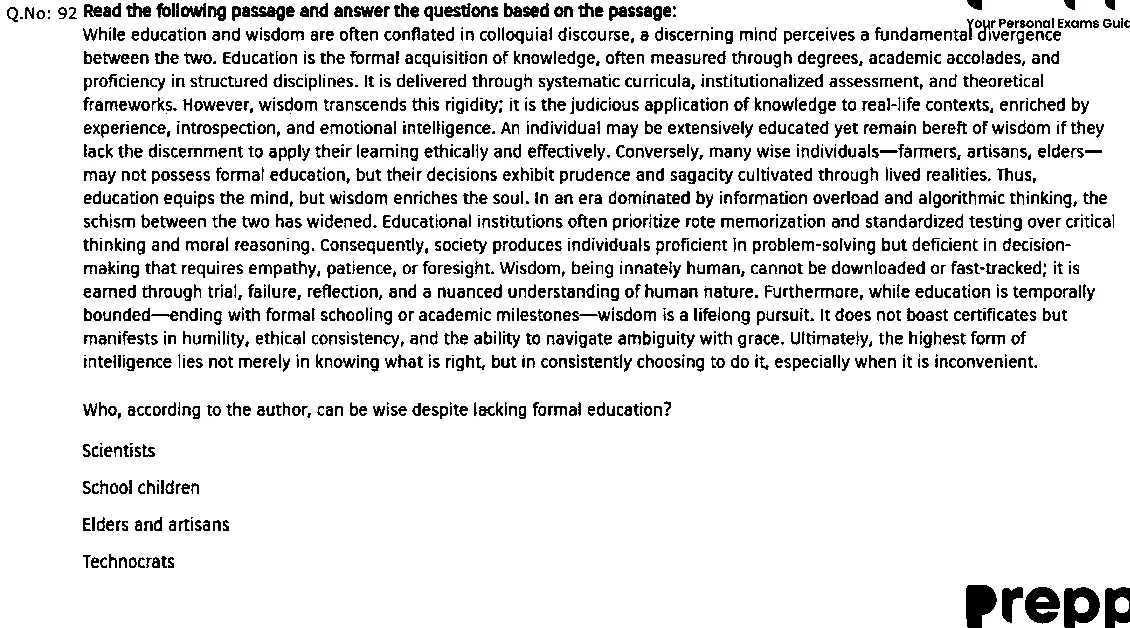
- A
Option A (shown in the question image)
- B
Option B (shown in the question image)
- C
Option C (shown in the question image)
- D
Option D (shown in the question image)
Show answer
C. Option C (shown in the question image)The marked option was checked against the archived source PDF. A worked explanation is not provided.
Paper & answer key PDF ↗ Question 93archived
Use the answer-neutral rendering of the archived question below.
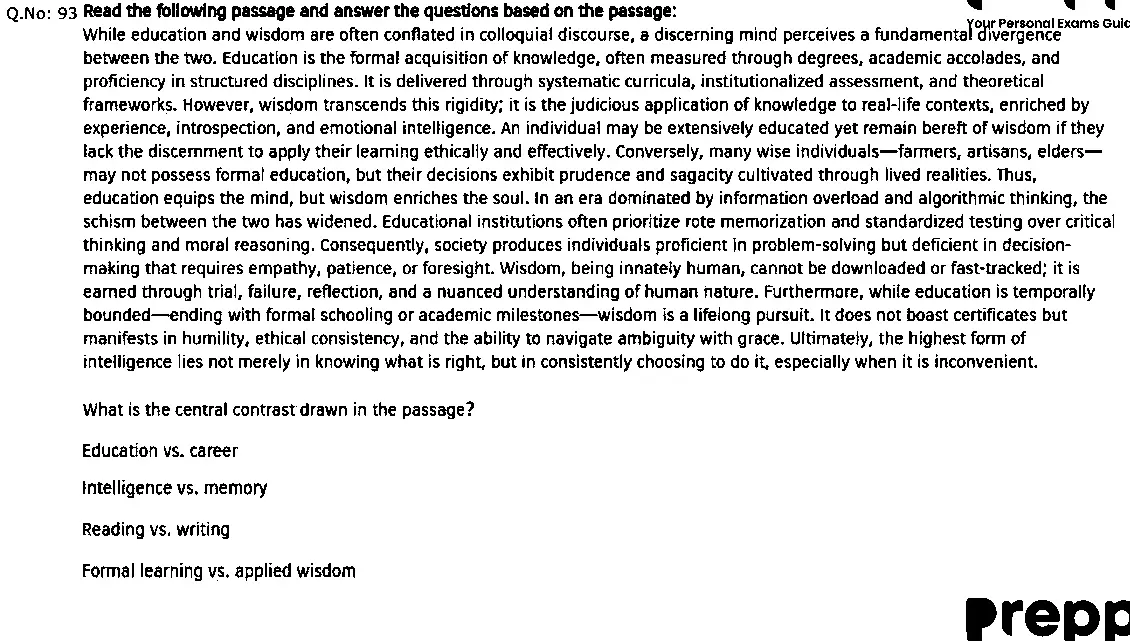
- A
Option A (shown in the question image)
- B
Option B (shown in the question image)
- C
Option C (shown in the question image)
- D
Option D (shown in the question image)
Show answer
D. Option D (shown in the question image)The marked option was checked against the archived source PDF. A worked explanation is not provided.
Paper & answer key PDF ↗ Question 94archived
Use the answer-neutral rendering of the archived question below.
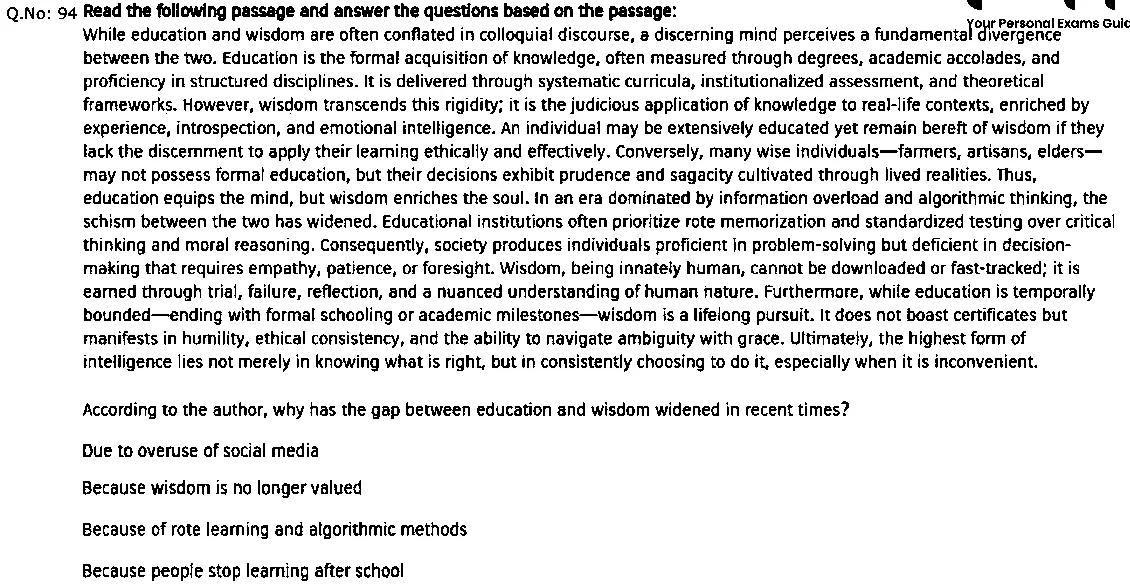
- A
Option A (shown in the question image)
- B
Option B (shown in the question image)
- C
Option C (shown in the question image)
- D
Option D (shown in the question image)
Show answer
C. Option C (shown in the question image)The marked option was checked against the archived source PDF. A worked explanation is not provided.
Paper & answer key PDF ↗ Question 95archived
Use the answer-neutral rendering of the archived question below.

- A
Option A (shown in the question image)
- B
Option B (shown in the question image)
- C
Option C (shown in the question image)
- D
Option D (shown in the question image)
Show answer
B. Option B (shown in the question image)The marked option was checked against the archived source PDF. A worked explanation is not provided.
Paper & answer key PDF ↗ Question 96archived
Use the answer-neutral rendering of the archived question below.

- A
Option A (shown in the question image)
- B
Option B (shown in the question image)
- C
Option C (shown in the question image)
- D
Option D (shown in the question image)
Show answer
C. Option C (shown in the question image)The marked option was checked against the archived source PDF. A worked explanation is not provided.
Paper & answer key PDF ↗ Question 97archived
Use the answer-neutral rendering of the archived question below.
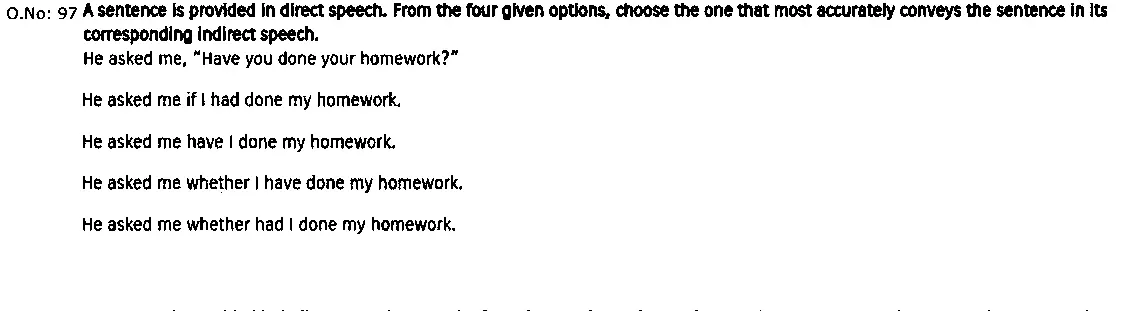
- A
Option A (shown in the question image)
- B
Option B (shown in the question image)
- C
Option C (shown in the question image)
- D
Option D (shown in the question image)
Show answer
A. Option A (shown in the question image)The marked option was checked against the archived source PDF. A worked explanation is not provided.
Paper & answer key PDF ↗ Question 98archived
Use the answer-neutral rendering of the archived question below.
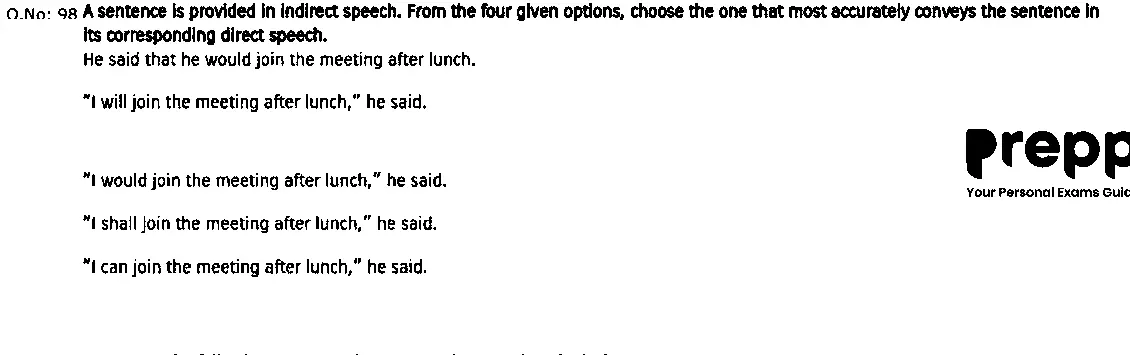
- A
Option A (shown in the question image)
- B
Option B (shown in the question image)
- C
Option C (shown in the question image)
- D
Option D (shown in the question image)
Show answer
A. Option A (shown in the question image)The marked option was checked against the archived source PDF. A worked explanation is not provided.
Paper & answer key PDF ↗ Question 99archived
Use the answer-neutral rendering of the archived question below.
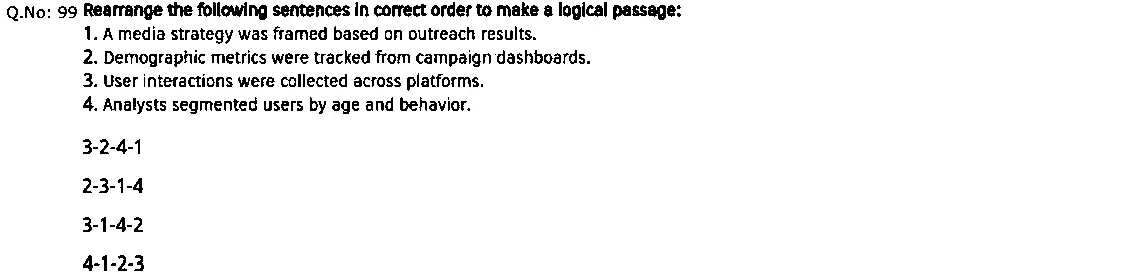
- A
Option A (shown in the question image)
- B
Option B (shown in the question image)
- C
Option C (shown in the question image)
- D
Option D (shown in the question image)
Show answer
A. Option A (shown in the question image)The marked option was checked against the archived source PDF. A worked explanation is not provided.
Paper & answer key PDF ↗ Question 100archived
Use the answer-neutral rendering of the archived question below.
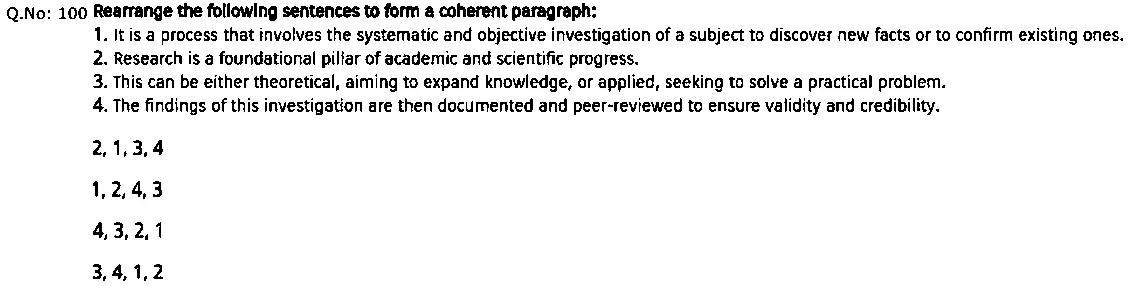
- A
Option A (shown in the question image)
- B
Option B (shown in the question image)
- C
Option C (shown in the question image)
- D
Option D (shown in the question image)
Show answer
A. Option A (shown in the question image)The marked option was checked against the archived source PDF. A worked explanation is not provided.
Paper & answer key PDF ↗ Browser storage is unavailable. You can still browse and practise; progress will last for this visit.